Vue.js 3 Snapshot Testing Tutorial
In this Vue tutorial we learn how to compare two images of an application with snapshot testing.
We cover how to write and compare snapshots with Jest, how to update an older snapshot and how to use mocked data in a test.
Lesson Video
If you prefer to learn visually, you can watch this lesson in video format.
Lesson Project
If you want to follow along with the examples, you will need an app generated by the Vue CLI with the Jest Testing package installed .
We’ll also need the following component.
- /src/components/HelloWorld.vue
The project should look similar to the following.
project-name/
├── public/
├── src/
|   ├── components/
|   |   └── HelloWorld.vue
|   |
|   └── App.vue
|
├── tests/
|   ├── unit/
|   |   └── example.spec.js
|
└── jest.config.js
To keep things simple we’ll use the example.spec.js file to write our tests in, so it’s safe to delete the code in it. We’ll also simplify the root App and HelloWorld components.
The root App component will import the HelloWorld component.
<template>
  <hello-world />
</template>

<script>
import HelloWorld from './components/HelloWorld.vue'

export default {
  components: { HelloWorld }
}
</script>
And the HelloWorld component will just have a heading with some identifying text.
<template>
  <h1>Hello World</h1>
</template>
What is Snapshot testing?
A snapshot test compares two images of an application, similar to the game Spot the Difference . If the program finds any differences between the images, it will consider the test a failure.
Even though Jest is primarily a unit testing library, it can handle snapshot testing. We’ll be using Jest to write our snapshot tests because it helps with one of the main problems of such testing.
Different browsers and window sizes may cause images to generate differently each time, even if the application hasn’t changed at all. This can cause the test to fail where it should technically pass.
Jest solves the problem by serializing the application. Basically, it converts the application to a string and compares the two strings instead of two images.
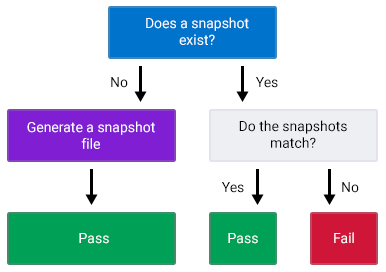
Let’s take a quick look at how Jest handles snapshot testing.
When we run a snapshot test, the first thing Jest will do is check if a snapshot exists.
- If a snapshot doesn’t exist, it will generate the serialized string and automatically pass the test.
- If a snapshot exists, it will compare the new string to the latest older one and either pass or fail.
We should always run a snapshot test more than once. It should pass multiple times if we haven’t changed the application or the test.
We should also try to limit the amount of tests per component to as few as possible because they are highly susceptible to failure. Typically, one snapshot test per component is all we need.
How to write a snapshot test with Jest's toMatchSnapshot
Typically, we would use an assertion to check that the something matches something in a component.
const wrapper = mount(component)

expect(wrapper.text()).toMatch('something')
When we write snapshot tests, we use the toMatchSnapshot method on the root DOM element in the component.
note Snapshot tests require the element as the input.
const wrapper = mount(component)

expect(wrapper.element).toMatchSnapshot()
The toMatchSnapshot method will generate a snapshot based on the input in the expect method ( wrapper.element ) and compare it to an existing snapshot. If an existing snapshot doesn’t exist, it will create a file with the serialized string.
As an example, let’s create a snapshot test to see if the HelloWorld component’s output (the template) renders correctly.
import { mount } from '@vue/test-utils'
import HelloWorld from '@/components/HelloWorld.vue'

describe('HelloWorld.vue', () => {
  it('renders correctly', () => {
    // mount the component
    const wrapper = mount(HelloWorld)

    // generate a new snapshot of
    // the component's template
    expect(wrapper.element).toMatchSnapshot()
  })
})
Because we’re using Jest, we can use the same command as the unit tests to run the snapshot test.
npm run test:unitThe test should pass with the following output.
PASS  tests/unit/example.spec.js
 HelloWorld.vue
   √ renders correctly (24ms)

› 1 snapshot written.
Snapshot Summary
› 1 snapshot written from 1 test suite.
That means our first snapshot was generated. If we take a look in the editor Explorer pane, we should see a new file in the /tests/unit/__snapshots__/example.spec.js.snap directory.
It should look similar to the following.
exports[`HelloWorld.vue renders correctly 1`] = `
<div
  data-v-app=""
>

  <h1>
    Hello World
  </h1>

</div>
`
This is the serialized string that will be compared to the next generated snapshot when we run the test a second time.
tip If you’re using Visual Studio Code as your editor, you can install the official Jest plugin for syntax highlighting in .snap files. It also comes with additional features that makes working with snapshots easier.
If we run the test a second time without changing the test or the component, it should pass with the following output.
PASS  tests/unit/example.spec.js
 HelloWorld.vue
   √ renders correctly (24ms)
Jest didn’t rewrite the snapshot, it just compared a newly generated one to the first.
How to update a snapshot
If we need to make a legitimate change to our file, we’ll need to update the snapshot to reflect that change.
To do that, we’ll need to add the update flag to our test:unit script in the package.json file.
We don’t want to override the original script, we just want to copy it and add the -u flag to the end. We’ll also change the command to run the script to be test:unit:update .
"test:unit:update": "vue-cli-service test:unit -u"The “scripts” section of the package.json file should now look similar to the following.
"scripts": {
  "serve": "vue-cli-service serve",
  "build": "vue-cli-service build",
  "test:unit": "vue-cli-service test:unit",
  "test:unit:update": "vue-cli-service test:unit -u",
  "lint": "vue-cli-service lint"
}
Running the command will update the snapshot after we’ve made changes to the component.
As an example, let’s change the text in the HelloWorld component.
<template>
  <h1>Hello there</h1>
</template>
Then, run the normal test command. It should fail with the following output.
FAIL  tests/unit/example.spec.js
 HelloWorld.vue
   × renders correctly (29ms)

 ● HelloWorld.vue › renders correctly

   expect(received).toMatchSnapshot()

   Snapshot name: `HelloWorld.vue renders correctly 1`

   - Snapshot
   + Received

   @@ -2,9 +2,9 @@
       data-v-app=""
     >

       <h1>
   -     Hello World
   +     Hello there
       </h1>

     </div>
Jest will show us a diff of why it failed, making it easy to identify the problem.
The snapshot still contains the word ‘World’ instead of the new one we changed it to.
exports[`HelloWorld.vue renders correctly 1`] = `
<div
  data-v-app=""
>

  <h1>
    Hello World
  </h1>

</div>
`
If we run the update command, it should pass with the following output.
PASS  tests/unit/example.spec.js
 HelloWorld.vue
   √ renders correctly (26ms)

› 1 snapshot updated.
Snapshot Summary
› 1 snapshot updated from 1 test suite.
If we look at the generated snapshot file, the change we made to the component will be in the string.
exports[`HelloWorld.vue renders correctly 1`] = `
<div
  data-v-app=""
>

  <h1>
    Hello there
  </h1>

</div>
`
Running the normal test command now will pass the test again.
Using mocked data in a snapshot test
We should try to test the real output of our components in snapshot tests. That said, it is possible to use locally defined (mocked) data in a snapshot test.
As an example, let’s change our HelloWorld component to define a prop called msg and output its contents instead of the static text.
<template>
  <h1>{{ msg }}</h1>
</template>

<script>
export default {
  props: {
    msg: String
  }
}
</script>
In the root App component, we’ll add the prop and a string.
<template>
  <hello-world msg="Hello there"/>
</template>

<script>
import HelloWorld from './components/HelloWorld.vue'

export default {
  components: { HelloWorld }
}
</script>
But in the test, we’ll define a different string and pass it to the mounted component’s props option.
import { mount } from '@vue/test-utils'
import HelloWorld from '@/components/HelloWorld.vue'

describe('HelloWorld.vue', () => {
  it('renders correctly', () => {
    // locally defined data
    const msg = 'different message'

    const wrapper = mount(HelloWorld, {
      props: { msg }
    })

    expect(wrapper.element).toMatchSnapshot()
  })
})
We’ll have to run the update command to ensure the snapshot reflects the changes. The generated snapshot file should now look similar to the following.
exports[`HelloWorld.vue renders correctly 1`] = `
<h1>
  different message
</h1>
`
Notice that the snapshot uses the mocked data instead of the real string we defined in the root App component.
Running the normal test command should pass the test.
Further Reading
For more information on the topics covered in this lesson, please see the revelant sections below.