Vue.js 3 Provide & Inject State Management Tutorial
In this Vue tutorial we learn a simple state management solution with the Provide & Inject APIs.
We cover how to provide data and inject it into components, how to use data in providing components and Provide & Inject's limitations.
Lesson Video
If you prefer to learn visually, you can watch this lesson in video format.
Lesson Project
If you want to follow along with the examples, you will need an app generated by the Vue CLI as well as the following extra components.
- src/components/ComponentA.vue
- src/components/ComponentB.vue
- src/components/ComponentC.vue
The project should look similar to the following.
project-folder/
├── src/
|   ├── components/
|   |   ├── ComponentA.vue
|   |   ├── ComponentB.vue
|   |   ├── ComponentC.vue
|   └── App.vue
We want to nest the components inside each other to create a component tree like the following.
├── App.vue
|   ├── ComponentA.vue
|   |   ├── ComponentB.vue
|   |   |   └── ComponentC.vue
We will start by nesting ComponentA in the root App component.
<template>
  <h1>Root App Component</h1><hr>

  <component-a />
</template>

<script>
import ComponentA from './components/ComponentA'

export default {
  components: { ComponentA }
}
</script>
Then, we nest ComponentB inside ComponentA . We are nesting a component that’s inside the same directory so we have to adjust the import statement to reflect that.
<template>
  <p>Component A</p><hr>

  <component-b />
</template>

<script>
import ComponentB from './ComponentB'

export default {
  components: { ComponentB }
}
</script>
After that, we nest ComponentC inside ComponentB .
<template>
  <p>Component B</p><hr>

  <component-c />
</template>

<script>
import ComponentC from './ComponentC'

export default {
  components: { ComponentC }
}
</script>
Finally, we just have some identifying text in ComponentC .
<template>
  <p>Component B</p><hr>
</template>
What is Provide & Inject
The Provide and Inject API’s provide a way to pass data down through a component tree without going through each level. It can be used as a simple state management solution.
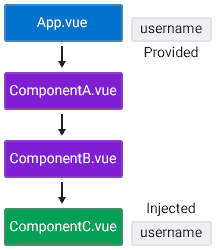
As an example, let’s consider the following application structure.
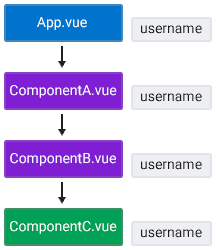
Our component tree consists of four components, each nested inside its parent up to the root App component.
Imagine that the root App component contains a username that we want to use in ComponentC . Typically, the username would have to be passed down through components A and B to be available in ComponentC .
We can bypass the whole chain by providing the prop in the root app component, then injecting it into ComponentC directly.
How to provide data to another component
To provide data to another component, we have to specify that data in the provide option of the config object in the component we want to provide data from.
<script>
export default {
  provide: {
    data: 'value'
  }
}
</script>
As an example, we’ll provide a username in the root App component that we want to send to ComponentC .
<template>
  <h1>Root App Component</h1><hr>

  <component-a />
</template>

<script>
import ComponentA from './components/ComponentA'

export default {
  components: { ComponentA },
  provide: {
    username: 'John'
  }
}
</script>
The username is now available to all components downwards in the tree.
How to inject data into another component
Once data has been provided, we can use the inject option in a component where we want to use it.
The inject option receives an array of provided values. These values must match the keys in the providing component.
<script>
export default {
  inject: ['data']
}
</script>
To demonstrate, we’ll inject the username we provided from the root App component into ComponentC .
<template>
  <p>Component C</p>
  <p>{{ username }}</p>
</template>

<script>
export default {
  inject: ['username']
}
</script>
If we save and take a look at the browser, we can see the username displayed under the “ComponentC” paragraph.
So, we bypassed the other components in the tree and received the data directly where we wanted to use it.
The great thing about Provide and Inject is that not only does it improve performance, but we can use the provided data anywhere in the tree.
As an example, let’s say that at some point our ComponentA changes and we need to access to the username inside it. We can then simply inject the data into ComponentA because it’s already provided and available globally.
<template>
  <p>Component A</p>
  <p>{{ username }}</p><hr>

  <component-b />
</template>

<script>
import ComponentB from './ComponentB'

export default {
  components: { ComponentB },
  inject: ['username']
}
</script>
How to use provided data in the component it's provided from
Sometimes we will want to use the provided data in the same component that we provide it from. But Vue doesn’t doesn’t allow us to inject data into the same component it’s coming from.
We will have to define our provided data as data properties. Then we convert the provide option from an object to a function that returns an object with the data properties.
<script>
export default {
  data() {
    return { data: 'value' }
  },
  provide() {
    return {
      data: this.data
    }
  }
}
</script>
To demonstrate, let’s modify our earlier example and define username as a data property. Then, we’ll convert provide from an option to a function and return the username from it.
<template>
  <h1>Root App Component</h1>
  <p>{{ username }}</p><hr>

  <component-a />
</template>

<script>
import ComponentA from './components/ComponentA'

export default {
  components: { ComponentA },
  data() {
    return { username: 'John' }
  },
  provide() {
    return {
      username: this.username
    }
  }
}
</script>
If we run the example in the browser, it will show the username under the big heading as well as those in the nested components.
Both have the same names here so it may be a little confusing. The nested components use the data that’s returned from the provide function, the current component uses the data property.
If we change the data property name, we have to change it in the template as well, otherwise it won’t render anything.
<template>
  <h1>Root App Component</h1>
  <p>{{ user }}</p><hr>

  <component-a />
</template>

<script>
import ComponentA from './components/ComponentA'

export default {
  components: { ComponentA },
  data() {
    return { user: 'John' }
  },
  provide() {
    return {
      username: this.user
    }
  }
}
</script>
Provide & Inject only works from parent to child
Because Provide and Inject technically uses props, it only works downwards from a parent component to a child component.
As an example, let’s provide the username in ComponentA and inject it one level up into the root App component.
<template>
  <p>Component A</p><hr>

  <component-b />
</template>

<script>
import ComponentB from './ComponentB'

export default {
  components: { ComponentB },
  provide: {
    username: 'John'
  }
}
</script>
<template>
  <h1>Root App Component</h1>
  <p>{{ username }}</p><hr>

  <component-a />
</template>

<script>
import ComponentA from './components/ComponentA'

export default {
  components: { ComponentA },
  inject: ['username']
}
</script>
If we save and take a look at the browser, the username doesn’t display under the root App component’s heading. It does still display downwards in the hierarchy in ComponentC .
Vue will raise a warning in the console that indicates the injection wasn’t found.
[Vue warn]: injection "username" not found.
  at <App>