Vue.js 3 HTTP & Fetch API Tutorial
In this tutorial we learn how to use the Javascript Fetch API in Vue for HTTP requests.
We cover how to get, post, update and delete data with a fake REST API. We also cover the differences between PUT and PATCH updates and error handling.
- Lesson Video
- Lesson Project
- JSONPlaceholder
- What is the Fetch API?
- The fetch method
- How to receive data with an HTTP GET request
- Fetch data on page load
- How to handle a loading state
- How to send data with an HTTP POST request
- Updating data: PUT and PATCH
- PUT vs PATCH: Which one should we use when?
- How to delete data with an HTTP DELETE request
- Further Reading
Lesson Video
If you prefer to learn visually, you can watch this lesson in video format.
Lesson Project
If you want to follow along with the examples in this lesson, you will need an app generated by the Vue CLI . If you already have one from a previous lesson, you can use it instead.
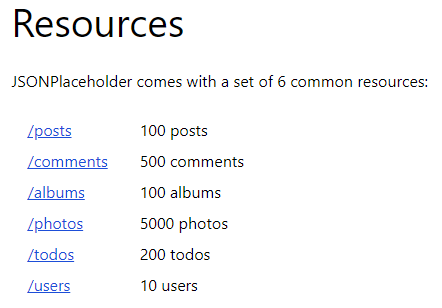
JSONPlaceholder
The focus of this lesson is how to use the Fetch API with Vue. We don’t want to worry about setting up and configuring a back end storage solution like Firebase yet.
For our API endpoint, we will be using JSONPlaceholder . JSONPlaceholder is a free online REST API with fake data.
Think of it as a fake back end storage solution that we can use for learning or testing.
What is the Fetch API?
The Fetch API is a built-in Javascript interface to handle HTTP requests. It replaces XMLHttpRequest with a more powerful and flexible feature set.
Fetch is also used for Service Workers to create offline web applications (PWAs).
The fetch method
The Fetch API uses the fetch method to perform all of its operations.
The method takes two arguments. The first argument is the path of the resource we want to fetch.
fetch('https://example.com/resource.ext')The second argument allows us to specify request options in an object.
For the most part, we are only interested in the method, headers and body options.
- method is a string with the type of HTTP request we send, like GET (retrieving data) or POST (sending/saving data).
- headers is an object that allows us to specify the type of content we are working with, among other things.
- body is also an object with the data we want to process.
fetch('https://example.com/resource.json', {
  method: 'POST',
  headers: {
    'Content-Type': 'content/type'
    // like application/json or text/xml
  },
  body: {
    // Example: Update JSON file with
    //          local data properties
    postTitle:  this.title,
    postAuthor: this.author
    // etc.
  }
})
When the method gets data, it doesn’t return it directly. It returns a promise with a Response object. So, we can chain then and catch blocks to it.
fetch('resource')
  .then()
  .catch()
Promises
Because we’re working with a server (and a dataset that might be large), processing the method may take some time.
A promise is Javascript’s way of saying: We promise the fetch method will process the data at some point.
The application won’t stop and wait for the promise to complete. While it’s running, Javascript will continue down the document and execute code.
// while fetching
fetch('resource')

// execute other
// code as well
some_method()
As mentioned before, we can chain then and catch blocks to a promise.
The then block is a way of saying: When the promise is fulfilled, then do something.
If we encounter an error at any point during the operation, we handle it in the catch block.
fetch('resource')
  // promise fulfilled
  .then(
    // process data
  )
  // and
  .catch(
    // catch any errors
    // that may arise
  )
The then and catch blocks take an anonymous or arrow function as argument.
fetch('resource')
  .then(response => {
    // process data
  })
  .catch(error => {
    console.error('Panic at the disco:', error);
  })
We can chain more than one then blocks to the statement if needed.
fetch('resource')
  .then(
    // do 'that'
  )
  .then(
    // do something after
    // (or because of) 'that'
  })
How to receive data with an HTTP GET request
To keep things simple for the moment, we’ll use a button to load the data we want. So let’s set it up in the root App component and bind it to an empty method.
<template>
  <button @click="getPosts">Show Posts</button>
</template>

<script>
export default {
  methods: {
    getPosts() {}
  }
}
</script>
On the JSONPlaceholder website , under the Routes section, we can see the data we are able to access from the API.
To start with, we want to retrieve the content of a single post. So, our fetch path can be the https://jsonplaceholder.typicode.com/posts/1 URL.
<template>
  <button @click="getPosts">Show Posts</button>
</template>

<script>
export default {
  methods: {
    getPosts() {
      fetch('https://jsonplaceholder.typicode.com/posts/1')
    }
  }
}
</script>
When getting data, we don’t have to add the second argument with the request options.
- The default request type for the fetch method is GET, we don’t have to specify it explicitly.
- The content already has a type, so there’s no need for that either. If we want to convert the data to another type, we do so after we retrieve it.
- Because we are not adding or updating values, there is nothing to put in the body.
As mentioned earlier, the method returns a promise containing a response object. But this is just the HTTP response, not the actual JSON content. We will need to extract the JSON content from the response ourselves.
The response object implements the Body interface which contains the json method. This method will parse the content and return a promise with the result as an object.
note JSON is the de facto standard of storing data in NoSQL databases. In most cases, we will use this method to extract our JSON data from the response.
Let’s start by chaining a then block to the fetch method. Then we create an anonymous function with a parameter to store the response object in.
The parameter name can be anything you want, we chose to call it “response”.
The last step is to call the json method on the response object.
<template>
  <button @click="getPosts">Show Posts</button>
</template>

<script>
export default {
  methods: {
    getPosts() {
      fetch('https://jsonplaceholder.typicode.com/posts/1')
        .then(function (response) {
          response.json()
        })
    }
  }
}
</script>
At this point, Javascript gets and extracts the data. Now we can actually use that data.
To do that, we need to return the parsed results.
fetch('https://jsonplaceholder.typicode.com/posts/1')
  .then(function(response) {
    return response.json()
  })
When we return a value, it is passed to the next then block. If we use another function, the value will be stored in its parameter.
fetch('https://jsonplaceholder.typicode.com/posts/1')
  .then(function(response) {
    return response.json()
  })
  .then(function(data) {
    // use data
  })
The json method returns an object. So, in the example above, the data parameter becomes an object and we can access the keys of the parsed results with dot notation.
fetch('https://jsonplaceholder.typicode.com/posts/1')
  .then(function(response) {
    return response.json()
  })
  .then(function(data) {
    // Example:
    // where 'title' is a key
    console.log(data.title)
  })
As mentioned earlier, we can also use arrow functions. Arrow functions are great in this case because they allow us to simplify our code.
If our arrow function only contains a single statement, we don’t have to specify the return keyword. In arrow functions, (param) => x is short for (param) => {return x} .
fetch('https://jsonplaceholder.typicode.com/posts/1')
  .then(response => response.json())
  .then(data => console.log(data.title))
Let’s modify our example to incorporate the code above. But instead of logging only the title, we will log the entire object.
<template>
  <button @click="getPosts">Show Posts</button>
</template>

<script>
export default {
  methods: {
    getPosts() {
      fetch('https://jsonplaceholder.typicode.com/posts/1')
        .then(response => response.json())
        .then(data => console.log(data))
    }
  }
}
</script>
If we click on the “Show Posts” button in the browser, the whole object will be shown in the console.
But logging the data to the console is not very useful, so let’s show the contents of the object on the page. To do that, we’ll store the data in an object and then use its keys in the template.
The blog posts from JSONPlaceholder has 4 keys.
- id
- userId
- title
- body
We’ll display the id and title in a heading below the button, and the body in a paragraph below the title. We won’t use the userId here.
<template>
  <button @click="getPosts">Show Posts</button>
  <hr>
  <h2>{{ post.id }} - {{ post.title }}</h2>
  <p>{{ post.body }}</p>
</template>

<script>
export default {
  data() {
    return {
      post: {}
    }
  },
  methods: {
    getPosts() {
      fetch('https://jsonplaceholder.typicode.com/posts/1')
        .then(response => response.json())
        .then(data => this.post = data)
    }
  }
}
</script>
If we click on the “Show Posts” button in the browser, it will show the post’s content below the horizontal line.
Get multiple posts
So far, we’ve only fetched a single object, but in a real world application we will often be working with many objects.
JSONPlaceholder has 100 post objects. To fetch them, we need to change the path to https://jsonplaceholder.typicode.com/posts/ .
We’ll also change the data property from an object to an array. When the data is assigned to it, it will become an array of objects. In the template, we’ll loop through the array with the v-for directive .
<template>
  <button @click="getPosts">Show Posts</button>
  <hr>
  <div v-for="p in post" :key="p.id">
    <h2>{{ p.id }} - {{ p.title }}</h2>
    <p>{{ p.body }}</p>
  </div>
</template>

<script>
export default {
  data() {
    return {
      post: []
    }
  },
  methods: {
    getPosts() {
      fetch('https://jsonplaceholder.typicode.com/posts/')
        .then(response => response.json())
        .then(data => this.post = data)
    }
  }
}
</script>
If we click on the “Show Posts” button in the browser, it will show all 100 posts.
Fetch data on page load
In some cases, we may want data to be available when a page loads.
As an example, let’s consider a blog. Most blogs show their most recent posts on the home page with either pagination or infinite scrolling.
In Vue, we can tap into certain stages of a component’s lifecycle, like when it first renders the component. A rendered component means we can access and manipulate the DOM, so this is the perfect place to fetch and display our data.
To demonstrate, we’ll invoke our method in the mounted Lifecycle hook instead of using a button.
<template>
  <div v-for="p in post" :key="p.id">
    <h2>{{ p.id }} - {{ p.title }}</h2>
    <p>{{ p.body }}</p>
  </div>
</template>

<script>
export default {
  data() {
    return {
      post: []
    }
  },
  methods: {
    getPosts() {
      fetch('https://jsonplaceholder.typicode.com/posts/')
        .then(response => response.json())
        .then(data => this.post = data)
    }
  },
  mounted() {
    this.getPosts()
  }
}
</script>
If we save the file and take a look in the browser, we see the blog posts display when the page loads.
How to handle a loading state
When we load data from a server, we may come across a situation where the data takes some time to fetch. This can happen for many reasons, like a slow user internet connection, a slow server or when we fetch a large dataset.
It’s important to keep user experience in mind and show users that the data is loading in some way. This could be with a simple “Loading…” message, or with a sophisticated loading spinner like SpinKit or Loading.io .
All we need to do is display the message or animated element with the v-if directive while the content is being fetched. Once we get a response, we can hide the message or animation again.
To demonstrate, let’s add a paragraph with loading text while the content is being fetched to our example.
<template>
  <p v-if="isLoading">Loading...</p>

  <div v-for="p in post" :key="p.id">
    <h2>{{ p.id }} - {{ p.title }}</h2>
    <p>{{ p.body }}</p>
  </div>
</template>

<script>
export default {
  data() {
    return {
      post: [],
      isLoading: false
    }
  },
  methods: {
    getPosts() {
      this.isLoading = true

      fetch('https://jsonplaceholder.typicode.com/posts/')
        .then(response => response.json())
        .then(data => {
          this.post = data
          this.isLoading = false
        })
    }
  },
  mounted() {
    this.getPosts()
  }
}
</script>
You may not see the message because the operation is too quick, but we can simulate a slow connection from the browser’s developer tools.
Press F12 to open the developer tools and navigate to the Network tab. Then select the Throttling drop-down menu and choose “Slow 3G”.
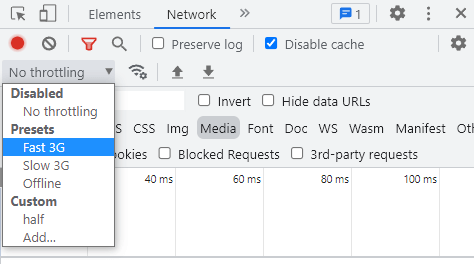
If we refresh the page now, we will see the loading message for a few seconds before the data is rendered.
tip Some UX designers recommend using skeleton loaders instead of animated spinners .
How to send data with an HTTP POST request
When we’re sending data, we need to specify additional options for the fetch method as a second argument.
- Request method . We’re sending data so the method options should be set to “POST”.
- Request headers . The only required header option is the “Content-Type”, which allows us to specify the type of media we’re sending in a specific format .
- Request body . Here, we specify the data we want to send and how it should be stored by the receiving storage layer.
fetch('path-to-end-point',{
  method:  'POST',
  headers: {
    'Content-Type': 'media-type'
  },
  body: {
    // data we want to send
  }
})
To demonstrate, we’ll set up our example to take input from a form for the same data that JSONPlaceholder expects.
<template>
  <section>
    <form @submit.prevent="setPost">
      <div>
        <label for="userId">UserID:</label>
        <input type="text" id="userId" v-model="postData.userId">
      </div>
      <div>
        <label for="title">Title: </label>
        <input type="text" id="title" v-model="postData.title">
      </div>
      <div>
        <label for="body">Body: </label>
        <textarea id="body" rows="6" cols="22" v-model="postData.body"></textarea>
      </div>
      <button>Create Post</button>
    </form>
  </section>
</template>

<script>
export default {
  data() {
    return {
      postData: {
        userId: '',
        title:  '',
        body:   ''
      }
    }
  }
}
</script>

<style>
html,body{margin:0;padding:0}
section{height:100vh;display:grid;justify-items:center;padding-top:40px}
div{margin:24px auto}
label{font-weight:bolder;display:block;margin-bottom:4px}
</style>
The next step is to add fetch in a custom method that will be executed when the form is submitted.
JSONPlaceholder allows us to use the same https://jsonplaceholder.typicode.com/posts/ resource path that we used with the GET request, so we can add it as the first argument.
setPost() {
  fetch('https://jsonplaceholder.typicode.com/posts/')
}
As the second argument, we’ll use the following.
- The request method is “POST”
- The content type is “application/json”.
- The content body is data we get from the form, assigned to its corresponding key in the JSON document.
setPost() {
  fetch('https://jsonplaceholder.typicode.com/posts/',{
    method:  'POST',
    headers: {
      'Content-Type': 'application/json'
    },
    body: {
      userId: this.userId,
      title:  this.title,
      body:   this.body
    }
  })
}
But the data in the body option is a Javascript object. They may look the same, but Javascript objects and JSON object literals are not the same thing. A JSON object literal cannot be an object because JSON is a string format.
That means we need to convert our Javascript object into a JSON object literal. Luckily, Javscript provides us with the JSON.stringify method to do the conversion.
All we have to do is specify an object we want to convert as the argument for the stringify method. In our case, that’s the object in the body option.
setPost() {
  fetch('https://jsonplaceholder.typicode.com/posts/',{
    method:  'POST',
    headers: {
      'Content-Type': 'application/json'
    },
    body: JSON.stringify({
      user_id: this.userId,
      title:   this.title,
      body:    this.body
    })
  })
    .then(response => response.json())
    .then(data => console.log(data))
}
To see if our data was added, we’ll log it to the console.
When we send data to JSONPlaceholder, it doesn’t actually add the data. It only fakes adding it, so we should see a post id of 101 in the console.
<template>
  <section>
    <form @submit.prevent="setPost">
      <div>
        <label for="userId">UserID:</label>
        <input type="text" id="userId" v-model="postData.userId">
      </div>
      <div>
        <label for="title">Title: </label>
        <input type="text" id="title" v-model="postData.title">
      </div>
      <div>
        <label for="body">Body: </label>
        <textarea id="body" rows="6" cols="22" v-model="postData.body"></textarea>
      </div>
      <button>Create Post</button>
    </form>
  </section>
</template>

<script>
export default {
  data() {
    return {
      postData: {
        userId: '',
        title:  '',
        body:   ''
      }
    }
  },
  methods: {
    setPost() {
      fetch('https://jsonplaceholder.typicode.com/posts/',{
        method:  'POST',
        headers: {
          'Content-Type': 'application/json'
        },
        body: JSON.stringify({
          userId: this.userId,
          title:  this.title,
          body:   this.body
        })
      })
        .then(response => response.json())
        .then(data => console.log(data))
    }
  }
}
</script>

<style>
html,body{margin:0;padding:0}
section{height:100vh;display:grid;justify-items:center;padding-top:40px}
div{margin:24px auto}
label{font-weight:bolder;display:block;margin-bottom:4px}
</style>
If we submit some data in the form and click “Create Post”, we should see the console log update with { id: 101 } , which means we successfully added the data.
note We will be able to see data we send when we work with an actual server in the Firebase lesson .
Updating data: PUT and PATCH
Updating data is similar to posting data.
The resource path may or may not be the same, depending on the API we are working with. We also need at least the method , headers and body request options.
The Javascript fetch method allows us to update data in two ways.
- We use PUT when we want to update all data.
- We use PATCH when we want to update only specific pieces of data.
How to update data with an HTTP PUT request
As mentioned above, we use the PUT request when we want to update all data. In our case that’s all the keys in the JSON object literal.
To keep the example simple, we’ll hardcode the values we want to PUT .
<template>
  <form @submit.prevent="updatePost">
    <button>Update Post</button>
  </form>
</template>

<script>
export default {
  methods: {
    updatePost() {
      fetch('https://jsonplaceholder.typicode.com/posts/1',{
        method:  'PUT',
        headers: {
          'Content-Type': 'application/json'
        },
        body: JSON.stringify({
          userId: 1,
          id:     1,
          title:  'New post title',
          body:   'Lorem ipsum dolor sit amet'
        })
      })
        .then(response => response.json())
        .then(data => console.log(data))
    }
  }
}
</script>
If we go to the browser and click on the “Update Post” button, we should see an object with the data we just updated in the browser’s console.
{
  "userId": 1,
  "id": 1,
  "title": "New post title",
  "body": "Lorem ipsum dolor sit amet"
}
note It’s important that we specify a value for all the keys in the JSON object literal when using PUT as the request method. If we omit a key, that key’s value will automatically be assigned the value of NULL .
How to partial update data with an HTTP PATCH request
If we only want to update a single piece of data in an entry set, we can use PATCH as the request method.
For example, let’s say we only want to change the title key of our blog post. We don’t want to update anything else.
<template>
  <form @submit.prevent="updatePost">
    <button>Update Post</button>
  </form>
</template>

<script>
export default {
  methods: {
    updatePost() {
      fetch('https://jsonplaceholder.typicode.com/posts/1',{
        method:  'PATCH',
        headers: {
          'Content-Type': 'application/json'
        },
        body: JSON.stringify({
          title: 'New post title'
        })
      })
        .then(response => response.json())
        .then(data => console.log(data))
    }
  }
}
</script>
If we go to the browser and click on the “Update Post” button, we should see an object with the data we just updated in the browser’s console.
{
    "userId": 1,
    "id": 1,
    "title": "New post title",
    "body": "quia et suscipit\nsuscipit recusandae consequuntur expedita et cum\nreprehenderit molestiae ut ut quas totam\nnostrum rerum est autem sunt rem eveniet architecto"
}
But this time, only the title will be updated. The other post content, like the body, will still have its original value.
PUT vs PATCH: Which one should we use when?
When updating data, when should we use PUT and when should we use PATCH ?
In short, when we need to replace an existing resource entirely, we can use PUT . When we are only doing a partial update, we can use PATCH .
For example, we can use PATCH if we only need to update the title of a blog post. But if there are changes in the post body as well, we can use PUT because the entire resource needs to be updated.
tip If you don’t care about the technical details of the two, you can skip past them to the following section on deleting data .
Idempotence
Let’s get a bit technical here for a second and take a look at the semantics that determine when we use which, namely idempotence .
The concept can be a little confusing so let’s try and simplify it.
First things first, PUT is idempotent. PATCH can be idempotent, but it isn’t required to be.
Let’s say we have a JSON object literal for a blog post with the keys title and body .
{
  "title": "Post Title",
  "body":  "Post body content"
}
When we use PUT , we are required to specify all the keys in our JSON object literal and the values for them.
It doesn’t matter if we only update the title of the blog post, the body content needs to be present in the request as well.
{
  "title": "New Post Title",
  "body":  "Post body content"
}
PUT will replace the entire JSON object literal with the new values we specify, so PUT is idempotent.
PUT is considered to be a modified version of the same stored resource and we are requesting the stored version to be replaced. The operation will always have the same outcome (the data we send replaces the entire data of the entity).
When we use PATCH , we only have to specify the key we want to replace, with its new value.
If we want to update only the post title, we don’t have to include the body key or its content.
{
  "title": "New Post Title"
}
PATCH will replace only the specified key, so it is not idempotent.
PATCH is a set of instructions describing how a stored resource should be modified to produce a new version.
But as we mentioned earlier, PATCH can be idempotent. That’s because we can use PATCH to update both the title and the body keys.
{
  "title": "New Post Title",
  "body":  "Post body content"
}
But PATCH is not really idempotent, because it doesn’t replace the resource like PUT does, it produces a new one.
Side effects
There are some side effects of both PUT and PATCH we should be aware of when building our API.
1. Let’s say we make a mistake in a PUT request and omit the body key. In that case its value will automatically be replaced with NULL , so the data will be lost.
{
  "title": "New Post Title",
  "body":  null
}
You might be thinking: Well that’s terrible, I’ll just PATCH and avoid any potential of it happening.
It’s not that easy though.
So far, we’ve updated the blog post with and identifier in its resource path.
'https://jsonplaceholder.typicode.com/posts/1'But what if there is a mistake here and the post id number is missing.
PUT can only replace a stored resource, it can’t create a new one. So if we send a PUT request to /posts/ , nothing will happen.
PATCH on the other hand, can create new resources. So if we send a PATCH request to /posts/ , it may try and create a new entry.
This is further complicated by the fact that we only have a title. What does a random title mean to the API? Will it break or just create a new blog post without a body.
2. Another point to note is that PATCH is defined to work on maps, dictionaries and key-value objects.
If we want to use it on something like a set, we will have to do a conversion first.
3. A benefit to using PATCH is that it doesn’t send the whole entity, so the operation costs less bandwidth.
Imagine if we had a blog post with 10 000 words and we only needed to change the title. These things add up.
How to delete data with an HTTP DELETE request
Deleting data with the fetch method is very simple. All we have to do is specify the DELETE request method on the resource path we want to delete.
Because we don’t care about the headers, body or whatever else when deleting data, we only have to specify the request method.
fetch('resource-path',{
  method: 'DELETE'
})
For example, if we want to delete post number 1, we can specify https://jsonplaceholder.typicode.com/posts/1 as the resource path in the fetch method.
fetch('https://jsonplaceholder.typicode.com/posts/1',{
  method: 'DELETE'
})
To demonstrate, let’s change our example to delete post number 1 from JSONPlaceholder.
<template>
  <form @submit.prevent="deletePost">
    <button>Delete Post</button>
  </form>
</template>

<script>
export default {
  methods: {
    deletePost() {
      fetch('https://jsonplaceholder.typicode.com/posts/1',{
        method: 'DELETE'
      })
        .then(response => response.json())
        .then(data => console.log(data))
    }
  }
}
</script>
If we go to the browser and click on the “Delete Post” button, we should see an empty object in the console. This indicates that the post was successfully deleted.
note JSONPlaceholder only mimics the delete request, so if we attempt to GET the post, it will still exist. On a real server, the data is deleted.
Further Reading
For more information on the topics covered in this lesson, please see the relevant sections below.