Vue.js 3 HTTP & Axios Tutorial
In this tutorial we learn how to use the popular Axios API for HTTP requests in Vue.
We cover some of its benefits, error handling and the convenience methods that allow us to easily get, post, update and delete data.
- Lesson Video
- Lesson Project
- What is Axios?
- How to install Axios
- The Axios API and convenience methods
- How to get data with axios.get
- How to send data with axios.post
- How to PUT update data with axios.put
- How to PATCH update data with axios.patch
- How to delete data with axios.delete
- How to handle errors in Axios
- Further Reading
Lesson Video
If you prefer to learn visually, you can watch this lesson in video format.
Lesson Project
If you want to follow along with the examples in this lesson, you will need an app generated by the Vue CLI . If you already have one from a previous lesson, you can use it instead.
What is Axios?
Axios is a simpler alternative to the native Javascript Fetch API. It has some additional benefits lilke automatic JSON data transformation.
Like the Fetch API, it’s a promise-based HTTP client and works in the browser. It also works isomorphically on Node.js, which means it can share a codebase in both the browser and Node.js.
Axios was inspired by the HTTP service in Angular and is built with the following features.
- Makes XMLHttpRequests from the browser.
- Makes http requests from Node.js.
- Supports the Promise API .
- Intercepts requests and responses.
- Transform request and response data.
- Ability to cancel requests.
- Automatic transformation of JSON data.
- Client side support for protecting against Cross Site Request Forgery (XSRF) .
In this lesson we will show examples of how to use Axios with the JSONPlaceholder service. It’s a free online REST API with fake data that makes it easy for us to focus on learning Axios with Vue, instead of worrying about setting up a database.
Everything we learn here will be applicable to whatever API you’re using, like Firebase .
How to install Axios
You can install Axios with npm by executing the following command in your project folder.
tip If you’re working in VSCode, you can go to Terminal > New Terminal to open a terminal or command prompt with the project folder already selected.
npm install axiosAlternatively, you can use yarn or bower .
# yarn
yarn add axios

# bower
bower install axios
Once the installation is complete, you should see Axios in the list of dependencies in your package.json file.
"dependencies": {
  "axios": "^0.21.1",
  "core-js": "^3.6.5",
  "vue": "^3.0.0",
  "vue-router": "^4.0.10"
}
When we want to use it in a component in Vue, we have to import the axios package above the config object in the component’s script block.
<script>
import axios from 'axios'

export default { }
</script>
If you want to load Axios through a CDN, you can use JsDeliver or unpkg.
// jsDeliver
<script src="https://cdn.jsdelivr.net/npm/axios/dist/axios.min.js"></script>

// unpkg
<script src="https://unpkg.com/axios/dist/axios.min.js"></script>
The Axios API and convenience methods
Axios allows us to send HTTP requests in one of two ways.
We can pass a configuration object to its constructor that consists of at least the request method (get, post etc.) and the url we want to send the request to. If we’re creating or updating data, we also include a data object.
axios({
  method: 'post',
  url: 'https://jsonplaceholder.typicode.com/posts',
  data: {
    title: 'Article title',
    body:  'Article body content',
    userId: 1,
  }
})
Alternatively, we can use one of the following convenience methods.
- axios.get()
- axios.post()
- axios.put()
- axios.patch()
- axios.delete()
These methods take up to three arguments, with only the first parameter (the url we want to send the request to) being required. We will use these methods in this lesson.
To keep the demonstrations simple, we’ll do everything in the mounted Lifecycle hook .
How to get data with axios.get
To receive data with Axios, we use the get convenience method with the URL of the API we send the request to as argument.
For our example, we want to fetch only a single blog post from JSONPlaceholder so the url is https://jsonplaceholder.typicode.com/posts/1 .
<template>
  <div></div>
</template>

<script>
import axios from 'axios'

export default {
  mounted() {
    axios.get('https://jsonplaceholder.typicode.com/posts/1')
  }
}
</script>
The get method will return a response object and because Axios is promise-based, we can chain a then block to the request to handle the response.
As an example, let’s add a then block and use it to log the data we get back to the console.
<template>
  <div></div>
</template>

<script>
import axios from 'axios'

export default {
  mounted() {
    axios
      .get('https://jsonplaceholder.typicode.com/posts/1')
      .then((response) => {
        console.log(response)
      })
  }
}
</script>
If we open the developer tools and go to the console, we will see an object in the log. If we expand this object and then its data property, we will see the post data.
So if we want to access values like the post title, we have to do it through response.data .
<template>
  <div></div>
</template>

<script>
import axios from 'axios'

export default {
  mounted() {
    axios
      .get('https://jsonplaceholder.typicode.com/posts/1')
      .then((response) => {
        console.log(response.data.title)
      })
  }
}
</script>
But logging the data to the console isn’t very useful, so let’s show it in the template block.
The blog posts from JSONPlaceholder contain 4 properties.
- id
- userId
- title
- body
We’ll output everything except the userId in the template block.
<template>
  <h2>{{ posts.id }} {{ posts.title }}</h2>
  <p>{{ posts.body }}</p>
</template>

<script>
import axios from 'axios'

export default {
  data() {
    return {
      posts: []
    }
  },
  mounted() {
    axios
      .get('https://jsonplaceholder.typicode.com/posts/1')
      .then((response) => {
        this.posts = response.data
      })
  }
}
</script>
Getting multiple posts works the same, except the API path is different and we output them in the template with the v-for directive .
<template>
  <div v-for="post in posts" :key="post.id">
    <h2>{{ post.id }} {{ post.title }}</h2>
    <p>{{ post.body }}</p>
  </div>
</template>

<script>
import axios from 'axios'

export default {
  data() {
    return {
      posts: []
    }
  },
  mounted() {
    axios
      .get('https://jsonplaceholder.typicode.com/posts/')
      .then((response) => {
        this.posts = response.data
      })
  }
}
</script>
How to send data with axios.post
To send data with Axios, we use the post convenience method with the URL of the API we send the request to as the first argument, and the data we want to send as the second argument.
For our example, we want to create a blog post on JSONPlaceholder so the url is https://jsonplaceholder.typicode.com/posts . We will also log the data we just sent.
<template>
  <div></div>
</template>

<script>
import axios from 'axios'

export default {
  mounted() {
    axios
    .post('https://jsonplaceholder.typicode.com/posts', {
      userId: '1',
      title:  'Article title',
      body:   'Article body content'
    })
    .then((response) => console.log(response))
  }
}
</script>
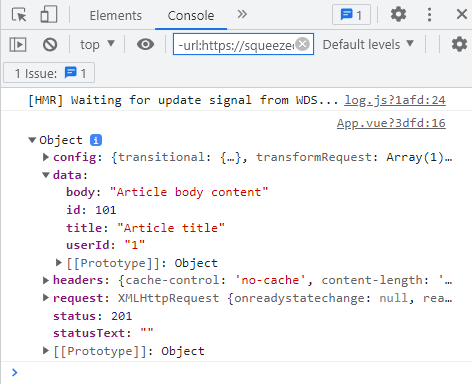
If we open the developer tools and take a look in the console, we should see the object with data we just sent. In the data property we can see that our new post has been added as id:101 .
The data can also come from a pre-existing object like a data property that captured form input.
In the example below we have a data property called post data. It receives the data from the form with v-model, when the submit event fires. Axios then uses the object as the data it posts to JSON placeholder.
<template>
  <section>
    <form @submit.prevent="createPost">
      <div>
        <label for="userId">UserID:</label>
        <input type="text" id="userId" v-model="postData.userId">
      </div>
      <div>
        <label for="title">Title: </label>
        <input type="text" id="title" v-model="postData.title">
      </div>
      <div>
        <label for="body">Body: </label>
        <textarea id="body" rows="6" cols="22" v-model="postData.body"></textarea>
      </div>
      <button>Create Post</button>
    </form>
  </section>
</template>

<script>
import axios from 'axios'

export default {
  data() {
    return {
      postData: {
        userId: '',
        title:  '',
        body:   ''
      }
    }
  },
  methods: {
  	createPost() {
		axios
		  .post('https://jsonplaceholder.typicode.com/posts', this.postData)
		  .then((response) => console.log(response))
	}
  }
}
</script>

<style>
html,body{margin:0;padding:0}
section{height:100vh;display:grid;justify-items:center;padding-top:40px}
div{margin:24px auto}
label{font-weight:bolder;display:block;margin-bottom:4px}
</style>
We can run the example in the browser and enter some dummy data. If we submit the form, we’ll see the console update with the post we just created.
How to PUT update data with axios.put
To PUT update data with Axios, we use the put convenience method with the URL of the API we send the request to as the first argument, and the data we want to update as the second argument.
For our example, we want to update the post with id:1 on JSONPlaceholder, so the url is https://jsonplaceholder.typicode.com/posts/1 . We will also log the data we just updated.
note As mentioned in the HTTP & Fetch lesson , when using PUT as the update method we have to specify all the keys even if we don’t update their values.
<template>
  <div></div>
</template>

<script>
import axios from 'axios'

export default {
  mounted() {
    axios
      .put('https://jsonplaceholder.typicode.com/posts/1', {
        id: '1',
        userId: '1',
        title:  'Article title',
        body:   'Article body content'
      })
      .then((response) => console.log(response))
  }
}
</script>
If open the developer tools and take a look in the console, we should see the object with data we just updated. In the data property we can see that post 1 has been updated with the values we specified.
How to PATCH update data with axios.patch
To PATCH update data with Axios, we use the patch convenience method with the URL of the API we send the request to as the first argument, and the data we want to update as the second argument.
For our example, we want to update the post with id:1 on JSONPlaceholder, so the url is https://jsonplaceholder.typicode.com/posts/1 . We will also log the data we just updated.
<template>
  <div></div>
</template>

<script>
import axios from 'axios'

export default {
  mounted() {
    axios
      .patch('https://jsonplaceholder.typicode.com/posts/1', {
        title:  'Article title only'
      })
      .then((response) => console.log(response))
  }
}
</script>
If open the developer tools and take a look in the console, we should see the object with data we just updated. In the data property we can see that post 1 has been updated with the values we specified.
note We cover the differences between PUT & PATCH in the HTTP & Fetch lesson if you are unsure which to use to update your data.
How to delete data with axios.delete
To delete data with Axios, we use the delete convenience method with the URL of the resource we want to delete in the API as the argument.
For our example, we want to delete the post with id:1 on JSONPlaceholder so the url is https://jsonplaceholder.typicode.com/posts/1 . We will also log the data we just deleted.
<template>
  <div></div>
</template>

<script>
import axios from 'axios'

export default {
  mounted() {
    axios
      .delete('https://jsonplaceholder.typicode.com/posts/1')
      .then((response) => console.log(response))
  }
}
</script>
This time when we take a look in the console, the data property will be empty.
How to handle errors in Axios
Axios returns an error object that we can use in a chained catch block to see what went wrong and were.
As an example, we’ll use the wrong url in a GET request and log the error in a catch block.
<template>
  <div></div>
</template>

<script>
import axios from 'axios'

export default {
  mounted() {
    axios
      .get('https://jsonplaceholder.typicode.com/wrong/')
      .catch((error) => console.log(error))
  }
}
</script>
Because the resource doesn’t exist, we see a 404 error in the console.
Error: Request failed with status code 404If we want more information about the error, we can use the toJSON Javascript method on it.
<template>
  <div></div>
</template>

<script>
import axios from 'axios'

export default {
  mounted() {
    axios
      .get('https://jsonplaceholder.typicode.com/wrong/')
      .catch((error) => console.log(error.toJSON()))
  }
}
</script>
This time our error has a lot more information.
...
{
  "url": "https://jsonplaceholder.typicode.com/wrong/",
  "method": "get",
  "headers": {
    "Accept": "application/json, text/plain, */*"
  },
  "transformRequest": [null],
  "transformResponse": [null],
  "timeout": 0,
  "xsrfCookieName": "XSRF-TOKEN",
  "xsrfHeaderName": "X-XSRF-TOKEN",
  "maxContentLength": -1,
  "maxBodyLength": -1
}
message: "Request failed with status code 404"
name: "Error"
...
Further Reading
For more information on the topics covered in this lesson, please see the relevant sections below.