Vue.js 3 Firestore Authentication & Security Tutorial
In this Vue tutorial we learn about Firebase Authentication and security.
We cover how to authenticate users in an application, register accounts, login, logout and update user profiles.
Finally, we take a look at how to add security rules to our database and lock it our domain.
Lesson Video
If you prefer to learn visually, you can watch this lesson in video format.
Lesson Project
If you want to follow along with the examples, you will need to create an app generated by the Vue CLI . You will also need to have the Firebase SDK installed , as well as a Firestore database set up .
If you are continuing from the previous lesson, you should already be set up ready to go.
What is Firebase Authentication
Firebase provides us with several ways to authenticate users in our application. Users can sign up with their email address and password, or use the app with anonymous sign-ins.
It also leverages industry standards like OAuth 2.0 and OpenID Connect that allow users to sign up with services like Github, Microsoft, Facebook etc.
How to enable Firebase Authentication
For our examples, we’ll allow users to register with their email and password.
To enable authentication, follow the steps below.
- Go to the Firebase console and select your project.
- In the menu on the left, select Build > Authentication .
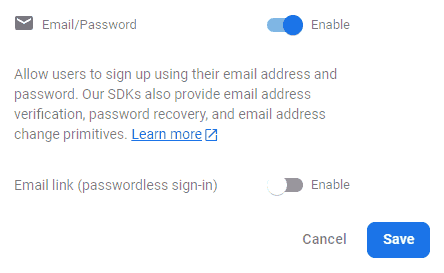
Under the Sign-in Method tab, choose Email/Password.
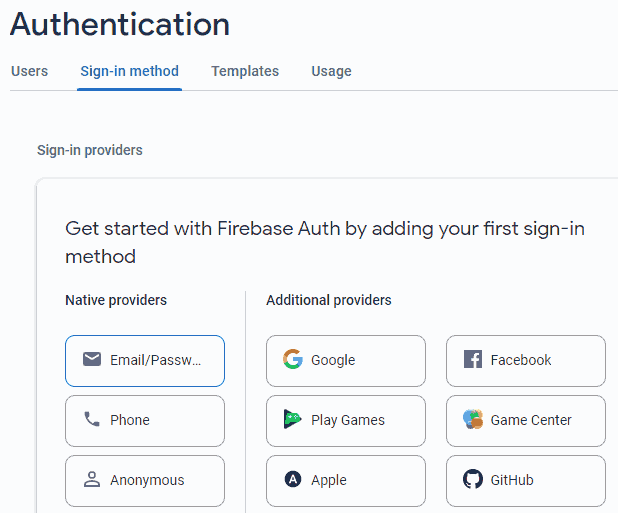
Enable the option and click Save.
The next step is to set up our example. We’ll need two components to start with.
- src/components/LoginForm.vue
- src/components/SignupForm.vue
project-name/
├── src/
|   ├── components/
|   |   ├── LoginForm.vue
|   |   └── SignupForm.vue
|   ├── firebase/
|   |   └── init.js
|   └── App.vue
The init.js file is where we store our Firebase config object and initialize the Firestore.
note Your config object will be different from the one below, you can find yours in Firebase > Project > Gear Icon > Project Settings > General tab > “Your apps” section.
import { initializeApp } from 'firebase/app'
import { getFirestore }  from 'firebase/firestore'

const firebaseConfig = {
  apiKey: "AIzaSyBXtNf-rupi7DheKW_s_gqdwAKTQ1ygPLE",
  authDomain: "khq-vue-tutorial.firebaseapp.com",
  projectId: "khq-vue-tutorial",
  storageBucket: "khq-vue-tutorial.appspot.com",
  messagingSenderId: "793965647816",
  appId: "1:793965647816:web:2c9edded419cdb44de12fd"
}

// init firebase
initializeApp(firebaseConfig)

// init & export firestore service
export const db = getFirestore()
The SignupForm component will have a form with 3 fields for the username, email address and password.
<template>
  <form @submit.prevent="signUp">
  <h2>Sign Up</h2>
    <input type="text"     placeholder="Username" required v-model="username">
    <input type="email"    placeholder="Email"    required v-model="email">
    <input type="password" placeholder="Password" required v-model="password">
    <button>Sign Up</button>
  </form>
</template>

<script>
export default {
  data() {
    return {
      username: '',
      email:    '',
      password: ''
    }
  },
  methods: {
    signUp() {
      console.log('Username:',this.username)
      console.log('Email:',   this.email)
      console.log('Password:',this.password)
    }
  }
}
</script>
The LoginForm component will have the email address and password fields.
<template>
  <form @submit.prevent="login">
  <h2>Log in</h2>
    <input type="email"    placeholder="Email"    required v-model="email">
    <input type="password" placeholder="Password" required v-model="password">
    <button>Log in</button>
  </form>
</template>

<script>
export default {
  data() {
    return {
      email:    '',
      password: ''
    }
  },
  methods: {
    login() {
      console.log('Email:',   this.email)
      console.log('Password:',this.password)
    }
  }
}
</script>
For the moment, both will just log the form data to the console so that we can test if everything works correctly.
The root App component will check if the user is logged in based on a data property. If the user is not logged in, it will show the login form with an option to show the signup form if the user doesn’t have an account yet.
<template>
  <div v-if="!isLoggedIn">
    <!-- login -->
    <template v-if="showLogin">
      <login-form/>
      <p>No account yet? <span @click="showLogin=false">Sign up</span> instead.</p>
    </template>
    <!-- or register -->
    <template v-else>
      <signup-form/>
      <p>Already registered? <span @click="showLogin=true">Login</span> instead.</p>
    </template>
  </div>
  <!-- is logged in -->
  <div v-else>
    <h2>Welcome</h2>
  </div>
</template>

<script>
import SignupForm from './components/SignupForm'
import LoginForm from './components/LoginForm'

export default {
  components: { SignupForm, LoginForm },
  data() {
    return {
      isLoggedIn: false,
      showLogin: true
    }
  }
}
</script>

<style>
p,h2{text-align:center}span{text-decoration:underline;cursor:pointer;color:blue}
form{display:flex;flex-direction:column;row-gap:16px;max-width:260px;margin:30px auto}
input,button{height:28px}input{padding-left:10px}button{width:fit-content;margin:auto}
</style>
If we run the example in the browser and add test data to the forms, it will show in the console once the form is submitted.
How to sign-up (register) with an email and password
To sign up a user with an email and password, we use the createUserWithEmailAndPassword method.
The method is imported from the ‘firebase/auth’ package and takes 3 arguments.
- An auth object.
- The email the user wants to register with.
- The password the user wants to register with.
createUserWithEmailAndPassword(
  authObject,
  email,
  password
)
We can get, or generate, an auth object with the getAuth method from the ‘firebase/auth’ package.
For our example, we’ll get the auth object in our init.js file.
import { initializeApp } from 'firebase/app'
import { getFirestore }  from 'firebase/firestore'
import { getAuth } from 'firebase/auth'

const firebaseConfig = {
  apiKey: "AIzaSyBXtNf-rupi7DheKW_s_gqdwAKTQ1ygPLE",
  authDomain: "khq-vue-tutorial.firebaseapp.com",
  projectId: "khq-vue-tutorial",
  storageBucket: "khq-vue-tutorial.appspot.com",
  messagingSenderId: "793965647816",
  appId: "1:793965647816:web:2c9edded419cdb44de12fd"
}

// init firebase
initializeApp(firebaseConfig)

// init & export firestore service
export const db = getFirestore()
// generate & export auth object
export const auth = getAuth()
To demonstrate, let’s add the create user logic to our SignupForm component’s signup method. For now, we’ll just log the user details to the console.
<template>
  <form @submit.prevent="signUp">
  <h2>Sign Up</h2>
    <input type="text"     placeholder="Username" required v-model="username">
    <input type="email"    placeholder="Email"    required v-model="email">
    <input type="password" placeholder="Password" required v-model="password">
    <button>Sign Up</button>
  </form>
</template>

<script>
import { createUserWithEmailAndPassword } from 'firebase/auth'
import { auth } from '../firebase/init.js'

export default {
  data() {
    return {
      username: '',
      email:    '',
      password: ''
    }
  },
  methods: {
    signUp() {
      // register new user
      createUserWithEmailAndPassword(auth,this.email,this.password)
      .then((credential) => {
        // registered and signed in
        console.log(credential.user)
      })
      .catch((error) => {
        console.log(error.message)
      })
    }
  }
}
</script>
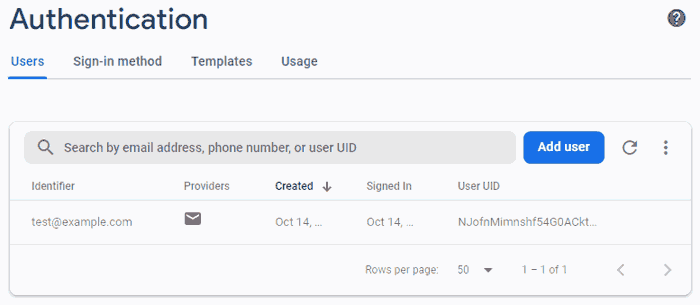
If we run the example in the browser and sign up with some fake user details, it will show it in the console.
tip Firebase automatically adds some validation for the password, it must be 6 characters or longer.
We can also see in the Firestore database that the user was registered and logged in.
How to update the user profile
We can update certain sections of the user’s profile, like the username, with the updateProfile method on the user object.
This method is imported from the ‘firebase/auth’ package and takes two arguments.
- The current user, retrieved from the auth object with the currentUser property.
- An object with the profile properties we want to update.
updateProfile(
  auth.currentUser,
  {
    property: value
  })
To demonstrate, let’s update a user’s profile with the username they enter when they sign up. In Firebase, the username is stored in a property called displayName .
We’ll also chain a then block to the method log out the updated value.
<template>
  <form @submit.prevent="signUp">
  <h2>Sign Up</h2>
    <input type="text"     placeholder="Username" required v-model="username">
    <input type="email"    placeholder="Email"    required v-model="email">
    <input type="password" placeholder="Password" required v-model="password">
    <button>Sign Up</button>
  </form>
</template>

<script>
import { createUserWithEmailAndPassword, updateProfile } from 'firebase/auth'
import { auth } from '../firebase/init.js'

export default {
  data() {
    return {
      username: '',
      email:    '',
      password: ''
    }
  },
  methods: {
    signUp() {
      // register and login user
      createUserWithEmailAndPassword(auth,this.email,this.password)
      .then(() => {

        // update 'displayName'
        updateProfile(auth.currentUser, {
          displayName: this.username
        })
        .then(() => {
          console.log(auth.currentUser.displayName)
        })

      })
    }
  }
}
</script>
This time when we sign up, it will add the username. If we take a look in the console, it will show the updated displayName .
Redirecting new users
When a new user is created with the createUserWithEmailAndPassword method, Firebase automatically updates their status as signed in. We can then redirect them to a member area.
There are several ways we can redirect users, like the router. But our example is very simple, we don’t need to redirect the user.
Our app uses the root App component as a member area and checks isLoggedIn to see if it should render the sign up/in components.
So we can emit an event from the SignupForm component when the profile has been updated.
<template>
  <form @submit.prevent="signUp">
  <h2>Sign Up</h2>
    <input type="text"     placeholder="Username" required v-model="username">
    <input type="email"    placeholder="Email"    required v-model="email">
    <input type="password" placeholder="Password" required v-model="password">
    <button>Sign Up</button>
  </form>
</template>

<script>
import { createUserWithEmailAndPassword, updateProfile } from 'firebase/auth'
import { auth } from '../firebase/init.js'

export default {
  // register event to emit
  emits: ['loggedIn'],
  data() {
    return {
      username: '',
      email:    '',
      password: ''
    }
  },
  methods: {
    signUp() {
      // register and login user
      createUserWithEmailAndPassword(auth,this.email,this.password)
      .then(() => {

        // update 'displayName'
        updateProfile(auth.currentUser, {
          displayName: this.username
        })
        .then(() => {
          // emit event
          this.$emit('loggedIn')
        })

      })
    }
  }
}
</script>
Then, we listen for the event in the root App component on the signup-form instance and change isLoggedIn to true, which means the sign up/in components won’t be rendered.
To personalize the user experience, we’ll import the auth object and set a data property to the user’s display name in the beforeUpdate lifecycle hook.
tip If a user is not logged in, the auth.currentUser property will return null. We can use it for some defensive programming.
<template>
  <div v-if="!isLoggedIn">
    <!-- login -->
    <template v-if="showLogin">
      <login-form/>
      <p>No account yet? <span @click="showLogin=false">Sign up</span> instead.</p>
    </template>
    <!-- or register -->
    <template v-else>
      <!-- listen for event -->
      <signup-form @loggedIn="isLoggedIn = true"/>
      <p>Already registered? <span @click="showLogin=true">Login</span> instead.</p>
    </template>
  </div>
  <!-- is logged in -->
  <div v-else>
    <h2>Welcome {{ displayName }}</h2>
  </div>
</template>

<script>
import SignupForm from './components/SignupForm'
import LoginForm from './components/LoginForm'
import { auth } from './firebase/init.js'

export default {
  components: { SignupForm, LoginForm },
  data() {
    return {
      isLoggedIn: false,
      showLogin: true,
      displayName: ''
    }
  },
  beforeUpdate() {
    if (auth.currentUser) {
      // set local 'displayName' to user's displayName
      this.displayName = auth.currentUser.displayName
    }
  }
}
</script>

<style>
p,h2{text-align:center}span{text-decoration:underline;cursor:pointer;color:blue}
form{display:flex;flex-direction:column;row-gap:16px;max-width:260px;margin:30px auto}
input,button{height:28px}input{padding-left:10px}button{width:fit-content;margin:auto}
</style>
If we run the example in the browser and sign up a new user, it will add the user and show the welcome screen.
In a project where you want to use the router, the process would be the same except the event functionality would push the user to a different route.
// listen for 'loggedIn' event
// execute 'sendToMemberArea' method
<signup-form @loggedIn="sendToMemberArea"/>

//...

methods: {
  sendToMemberArea() {
    // send to route
    router.push({ name: 'MemberAreaRoute' })
  }
}
In the view that the user is redirected to, the auth object can again be used to display the username.
How to sign-in (login) a new user with an email and password
To sign-in a user with their registered email and password, we use the signInWithEmailAndPassword method.
The method is imported from the ‘firebase/auth’ package and takes 3 arguments.
- An auth object.
- The email the user signed-up with.
- The password the user signed-up with.
signInWithEmailAndPassword(
  authObject,
  email,
  password
)
To demonstrate, we’ll add the sign-in logic to our LoginForm component. Then we’ll emit the same event that the SignupForm did to “redirect” to the member area.
<template>
  <form @submit.prevent="login">
  <h2>Log in</h2>
    <input type="email"    placeholder="Email"    required v-model="email">
    <input type="password" placeholder="Password" required v-model="password">
    <button>Log in</button>
  </form>
</template>

<script>
import { signInWithEmailAndPassword } from 'firebase/auth'
import { auth } from '../firebase/init.js'

export default {
  data() {
    return {
      email:    '',
      password: ''
    }
  },
  methods: {
    login() {
      // login user
      signInWithEmailAndPassword(auth,this.email,this.password)
      .then(() => {
        // emit event for member area
        this.$emit('loggedIn')
      })
    }
  }
}
</script>
In the root App component, we’ll listen for the event on the login-form instance and change isLoggedIn to true.
<template>
  <div v-if="!isLoggedIn">
    <!-- login -->
    <template v-if="showLogin">
      <!-- listen for event -->
      <login-form @loggedIn="isLoggedIn = true"/>
      <p>No account yet? <span @click="showLogin=false">Sign up</span> instead.</p>
    </template>
    <!-- or register -->
    <template v-else>
      <!-- listen for event -->
      <signup-form @loggedIn="isLoggedIn = true"/>
      <p>Already registered? <span @click="showLogin=true">Login</span> instead.</p>
    </template>
  </div>
  <!-- is logged in -->
  <div v-else>
    <h2>Welcome {{ displayName }}</h2>
  </div>
</template>

<script>
import SignupForm from './components/SignupForm'
import LoginForm from './components/LoginForm'
import { auth } from './firebase/init.js'

export default {
  components: { SignupForm, LoginForm },
  data() {
    return {
      isLoggedIn: false,
      showLogin: true,
      displayName: ''
    }
  },
  beforeUpdate() {
    if (auth.currentUser) {
      // set local 'displayName' to user's displayName
      this.displayName = auth.currentUser.displayName
    }
  }
}
</script>

<style>
p,h2{text-align:center}span{text-decoration:underline;cursor:pointer;color:blue}
form{display:flex;flex-direction:column;row-gap:16px;max-width:260px;margin:30px auto}
input,button{height:28px}input{padding-left:10px}button{width:fit-content;margin:auto}
</style>
If we run the example in the browser and log in with the email/password of one of the registered users, it will show the welcome screen.
How to sign-out (logout) a user
To sign-out a user, we use the signOut method.
The method is imported from the ‘firebase/auth’ package and takes a single argument.
- An auth object.
signOut(authObject)As an example, let’s add a sign-out button to our root App component that executes a method where we sign-out the user.
When the user is signed-out, we want them to see the login component instead of the welcome screen, so we’ll change isLoggedIn to false.
<template>
  <div v-if="!isLoggedIn">
    <!-- login -->
    <template v-if="showLogin">
      <login-form @loggedIn="isLoggedIn = true"/>
      <p>No account yet? <span @click="showLogin=false">Sign up</span> instead.</p>
    </template>
    <!-- or register -->
    <template v-else>
      <signup-form @loggedIn="isLoggedIn = true"/>
      <p>Already registered? <span @click="showLogin=true">Login</span> instead.</p>
    </template>
  </div>
  <!-- is logged in -->
  <div v-else>
    <h2>Welcome {{ displayName }}</h2>
    <button @click="signOut">Sign Out</button>
  </div>
</template>

<script>
import SignupForm from './components/SignupForm'
import LoginForm from './components/LoginForm'
import { auth } from './firebase/init.js'
import { signOut } from 'firebase/auth'

export default {
  components: { SignupForm, LoginForm },
  data() {
    return {
      isLoggedIn: false,
      showLogin: true,
      displayName: ''
    }
  },
  beforeUpdate() {
    if (auth.currentUser) {
      this.displayName = auth.currentUser.displayName
    }
  },
  methods: {
    signOut() {
      signOut(auth)
      .then(() => {
        // user signed-out
        this.isLoggedIn = false
      })
    }
  }
}
</script>

<style>
p,h2{text-align:center}span{text-decoration:underline;cursor:pointer;color:blue}
form{display:flex;flex-direction:column;row-gap:16px;max-width:260px;margin:30px auto}
input,button{height:28px}input{padding-left:10px}button{width:fit-content;margin:auto}
</style>
If we run the example in the browser and click on the button, the user is signed out and the LoginForm component is rendered.
Firestore Security Rules
Firebase allows us to secure our Firestore database with security rules. Security rules work on a permission system where we allow or restrict access to certain sections of the Firestore based on custom conditions.
There are two places where we can define these rules.
- In a dedicated firestore.rules file in the root of our project.
On the Firebase website, in our project > Build > Firestore Database > Rules .
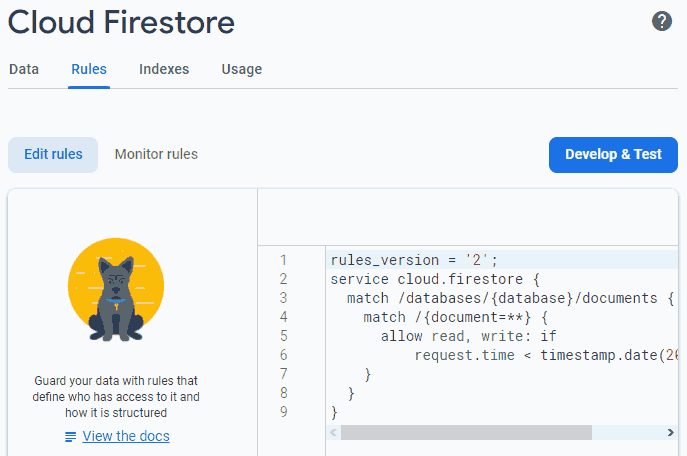
It doesn’t matter where we choose to define them, the rules in both places are written in exactly the same way.
Let’s take a look at a simple rule that allows any user to access the documents in our “countries” collection, then explain how it works.
rules_version = '2';
service cloud.firestore {
  match /databases/{database}/documents {
    // allow any user to access documents
    // in the "countries" collection
    match /countries/{countryId} {
      allow read;
    }
  }
}
match & allow
Rules work with match statements that select sections of the database, like a collection. Any rules we define inside a match , applies to whatever is selected.
To select a collection, we specify its directory name.
match /collectionNameWe can select specific documents in the collection, or specify a wildcard between curly braces. The wildcard will select all documents in that collection and can be named whatever we want.
// select specific document
match /collectionName/docName

// select all documents
match /collectionName/{wildcard}
Inside the match statement, we write the rules that will affect the selected section with allow expressions.
The expression uses the following operations as its evaluation.
- read CODE
- write CODE
Both can be broken into more specific operations if we need to.
- read
applies to collections and documents.
- get applies to reading a document.
- list applies to reading a collection.
- write
applies to
create
,
update
and
delete
.
- create applies to writing new data with setDoc or addDoc .
- update applies to updating data with updateDoc .
- delete applies to deleting data with deleteDoc and deleteField .
They can also be combined with a , (comma) as separator.
match /collectionName/{wildcard} {
  // any read operation
  allow read: condition;

  // specific read operations
  allow get: condition;
  allow list: condition;

  // any write operation
  allow write: condition;

  // specific write operations
  allow create: condition;
  allow update: condition;
  allow delete: condition;

  // combined operations
  allow read, write: condition;
}
Read and write only if authenticated pattern
A common pattern is to allow a user to read from and write to the database only if they’re authenticated on our application.
Firebase automatically gives a user a token with a unique user id (UID) that we can access from the auth object with the uid property. If the user is not logged in, the property will be null.
So, as a condition, we can simply check if the uid on the request.auth object is not null.
match /collectionName/{wildcard} {
  // read only if authenticated
  // and UID matches custom id field
  allow read: if request.auth.uid != null;
}
If we want the write permission to be the same, we can combine the two.
match /collectionName/{wildcard} {
  // read & write if authenticated
  // and UID matches custom id field
  allow read, write: if request.auth.uid != null;
}
In most cases, that should be enough. But we can go a step further.
Let’s say we have a note taking app where a user should be able to write to the database, but only read their own notes. Each time a user creates a new note, a custom ID field is populated with the UID from the auth object.
So we want to evaluate if the UID matches the custom one from our resource.data object.
match /collectionName/{wildcard} {
  // read & write if authenticated
  // and UID matches custom id field
  allow read, write: if request.auth.uid != null
                     && request.auth.uid == resource.data.customIdField;
}
How to lock the Firestore API to a single domain
We can tell Firebase to only accept API requests coming from our own domain by locking it.
To do that, we have to go to the Google Developers Console and select our Firebase project.
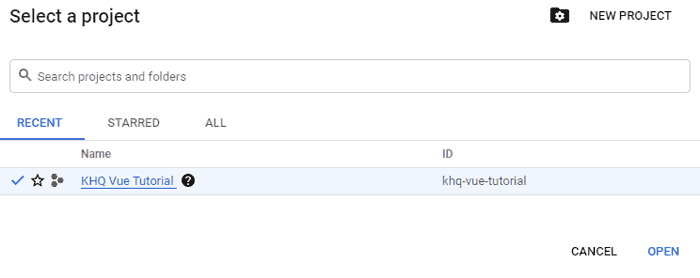
Form there we can go to Credentials > API Keys > and click on Browser key to open up the Key Restrictions.

Under Application restrictions we can choose HTTP referrers and then click ADD AN ITEM to add our domain.
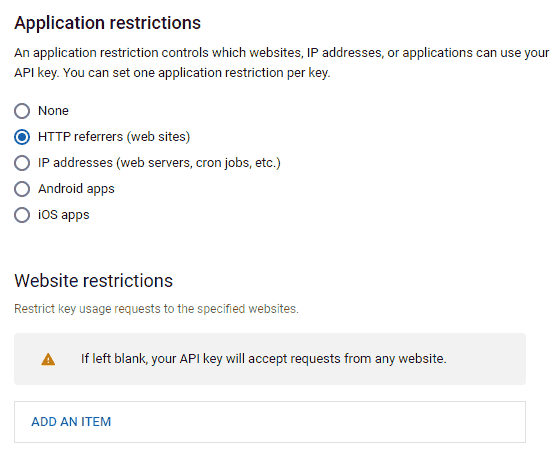
We can use several url patterns to restrict access.
The most common is to use any url in your own domain.
example.com/*Another common one is to lock the API to anything in your domain and any of its subdomains, including www .
*.example.com/*Further Reading
For more information on the topics covered in this lesson, please see the relevant section below.