Vue.js 3 Development Environment Tutorial
In this Vue tutorial we learn how to set up a basic Vue development environment that includes the Vue CLI.
We cover how to install and use the CLI to create new projects, run a development server, the Visual Studio Code IDE and Vetur.
Lesson Video
If you prefer to learn visually, you can watch this lesson in video format.
IDE Setup (Visual Studio Code)
For this course, we strongly recommend using Visual Studio Code as your code editor.
VSCode is free, available for all platforms and comes with optional extensions that will make development easier. To install VSCode, follow the steps below.
- Download the VSCode installer from the official website.
- Once the download has finished, Run the downloaded installer and follow the prompts.
tip Installation is fairly straight forward but if you get stuck, the official documentation provides installation guides for Windows , macOS and several Linux variants.
Although it’s not strictly required, we also recommend the Vetur extension for VSCode.
Vetur is a toolset for Vue that includes syntax higlighting, linting, formatting etc. It also includes autocomplete which makes coding faster, easier and removes a lot of unnecessary debugging.
tip The Official Vetur documentation is available on Github.
The Vue CLI
The Vue team created the Vue Command Line Interface (CLI) to help us quickly set up new projects in a complete development environment, including a local server.
When we run a local webpage from our system, the browser uses the file:// protocol to render that page. But Vue uses some modern Javascript features that only work on the http:// protocol.
The local server Vue sets up for us will mimic the http:// protocol, ensuring we don’t have any issues.
Another benefit of using the dev server is hot-reloading. Hot-reloading just means that every time we save changes to our code, it will be rendered immediately in the browser. We typically don’t have to hard-refresh the page and lose the application’s state.
note The hot-reloading isn’t perfect and you may need to refresh the page manually sometimes.
The CLI isn’t mandatory, it’s just a tool that makes the development workflow easier. We’ll be using it throughout most of this course for the examples.
How to install Node.js
Node is a Javascript runtime that allows us to use Javascript outside of the browser. We won’t need to learn Node or how to write server-side code, but the Vue CLI uses it behind the scenes so we need to install it.
To install Node.js, follow the steps below.
Go to the official Node.js download page and download the installer for your operating system.
tip We recommend installing the LTS (Long Term Support) version for the best support with Vue. If you already have the Current version installed, please uninstall it and install the LTS version.
Run the downloaded installer and follow the prompts in the Installation Wizard.
The default settings are fine, but the installer may give you the option on Windows to install the Chocolatey package manager . It’s not required for Vue but if it’s something you want, you can check the checkbox to include it in the installation.
note The Chocolatey installation will use Windows Powershell and install the latest stable release of Python , as well as Visual Studio Build Tools by default. Your anti-virus may also give you a warning, but it is safe to create an exception.
Next, let’s quickly test if Node was installed. To do this, open a Terminal (Linux/macOS) or Command Prompt (Windows).
Windows:
- Tap the Windows button on your keyboard or click on the Windows icon.
- Type ‘cmd’ and press Enter to launch a Command Prompt window.
MacOS:
- Open Applications > Utilities and double-click on Terminal.
Linux:
- Press Ctrl + Alt + T on your keyboard to open the terminal.
Then type in the following command and press Enter.
node -vIf you see a version number, Node.js was installed successfully. Any version above 8.9 is fine, but v12+ is recommended.
v16.2.0Don’t close your terminal/command prompt, we are going to use it again in a minute.
How to install the Vue CLI
Node comes bundled with the Node Package Manager (npm) that we are going to use to install the Vue CLI. We also use it to install some other packages later on when we need them.
To install the Vue CLI with npm, run the following command in your terminal/command prompt.
npm install -g @vue/cliFor macOS and Linux, you may need to add sudo in front of your command.
sudo npm install -g @vue/cliYou will then be prompted to enter you password, after which the installation will continue.
note Because we use the -g flag on the command, the Vue CLI will be installed globally. This means that it will be available for any project we create on our system.
Again, don’t close your terminal/command prompt. We’re going to use it to create a new project.
How to create a new project with the Vue CLI
To create a new project, we use the following command in the Terminal/Command Prompt.
vue create <app-name>Where <app-name> is the name of the project you want to create.
The standard naming convention is kebab-case, which uses dashes to separate multiple words in the name. PascalCase, camelCase and snake_case will work, but is considered a bad practice.
# kebab-case convention
my-first-app

# bad practice
MyFirstApp
myFirstApp
my_first_app

# doesn't work
my first app
To keep things organized, we’ll create a folder to store all the example projects for this course. It can be anywhere on your system, like the desktop.
We’re using Windows so we chose a folder called “VueProjects” on the main drive: C:\VueProjects\ .
Now open your Terminal/Command Prompt and navigate into the directory you chose (or made). Our command looks as follows.
cd C:\VueProjects\From here, we can run the command that will create our project. We’ll name our project “my-app”.
vue create my-appOnce you run the command, the CLI will ask you to choose some installation preferences.
tip You can navigate with the arrow keys and select an option with Enter . If there are multiple choices, we select them with Spacebar and then use Enter to confirm the selection.
The first preference it will ask is whether we want to use a standard Vue 2 project, a standard Vue 3 project, or manually select features.
To keep things simple for the moment, choose the Default Vue 3 project.
? Please pick a preset: (Use arrow keys)
  Default ([Vue 2] babel, eslint)
> Default (Vue 3) ([Vue 3] babel, eslint)
  Manually select features
Vue will now create the and install any dependencies it needs to work.
Once you’re more familiar with Vue and the CLI, you can choose to “Manually select features”. We demonstrate this option in several places throughout the course.
How to run the development server
Once the installation has finished, we can navigate into the new project.
cd my-appAnd run the developement server with the following command.
npm run serveKeep this server running while working on your projects so that it can hot-reload any changes you make.
tip If you want to quit the server, just press Ctrl + C and select y when asked for confirmation.
When we start the development server, Node and the CLI will do their thing and output a message similar to the following.
App running at:
- Local:   http://localhost:8080/

Note that the development build is not optimized.
To create a production build, run npm run build.
It’s just the address our dev server is running on. By default, it will be localhost:8080 .
If we take a look in the browser, we’ll see Vue created a nice landing page for us with some links to useful resources. As our first project, we will create our own page from scratch.
How to run the development server in Visual Studio Code
If you’re using Visual Studio Code, you can run the server directly from inside the IDE’s built-in terminal.
Option 1:
First, navigate into your new project folder with the Terminal/Command Prompt.
cd my-appThen open the project in Visual Studio Code.
code .Go to Terminal > New Terminal . This will open the built-in terminal in the bottom pane with the “my-first-app” directory already selected.
From there, run the development server command.
npm run serveOption 2:
Open Visual Studio Code and go to File > Open Folder . Navigate to your new project, select it and choose Select Folder .
Once the project is open, go to Terminal > New Terminal . This will open the built-in terminal in the bottom pane with the “my-first-app” directory already selected.
From there, run the development server command.
npm run serveNode will run the appropriate Vue CLI commands to start the server and give us a message similar to the following.
  App running at:
  - Local:   http://localhost:8080/

  Note that the development build is not optimized.
  To create a production build, run npm run build.
This is the address and port number where the dev server is running. You can Ctrl + Click on either of them and your default browser will open to that address.
If we take a look in the browser, we’ll see Vue created a nice landing page for us with some links to useful resources. As our first project, we will create our own page from scratch.
Vetur Linting Bug
If you have the Vetur extention installed on Visual Studio Code, you may encounter the following error when trying to start the development server.
Template root requires exactly one elementAt the moment, this bug is still unresolved and it may require you to turn off linting on the template block from the Vetur settings.
To do this, follow the steps below.
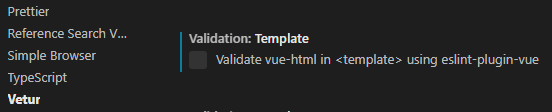
- In Visual Studio Code, go to File > Preferences > Settings to open the Settings tab.
- From there, expand the Extensions menu item on the list to show all of your installed extensions.
- Scroll down until you find Vetur and click on it to open its options on the right.
- Find the Validation:Template option and uncheck it.
If the development server is running, you will need to stop it by pressing Ctrl + C . Then run the npm run serve command again.
note This comes from an earlier version of Vue that required a wrapping element for multiple elements in a template block.
Vue 3 solves the issue with its Fragment API so we don’t have to worry about multiple elements. Once Vetur has fixed its bug, we can turn linting on again for the template block.
Exploring our new project
Let’s take a quick look at what was generated with our new project, what we have available, and any extra settings we may need.
In the Explorer pane of the IDE we can see all the files and folders that were generated.
my-app/
|
├── node_modules/
├── build/
├── src/
|
├── .gitignore
├── babel.config.js
├── package-lock.json
├── package.json
└── README.md
We’ll start from the top and quickly explain each.
1. The node_modules/ directory.
This directory is where npm stores all the packages that are required for the project to function, like Babel or Vuex etc.
tip If we share the project, or commit it to source control, we can exclude this folder.
All the packages and their dependencies are listed in the package.json file. If the node_modules folder isn’t present in our project, we can simply run the following command and NPM will reinstall everything listed in the package.json file.
npm install2. The build/ folder and its files.
This is where we place files that shouldn’t be processed by Vue (or more specifically the bundler Vue uses).
Some examples would be:
- favicon
- PWA icons
- robots.txt
- images
- etc.
The only file that does get processed in this folder is the index.html file. Vue injects the necessary files where the app is mounted before it copies the file over to the dist/ folder.
3. The dist/ folder and its files.
This folder doesn’t currently exist. It’s only generated when the project is built for production and contains all the files that we deploy to a server.
4. The src/ folder and its files.
This folder contains all our scripts, components, assets etc. that we use to create the web application. These files are compiled when we build the project to produce the files in the dist/ folder.
We will discuss these files and folders more throughout the following lessons.
5. The .gitignore file.
We use this file to tell GIT which files and folders should not be committed to source control. To keep things simple, we won’t be using source control in this course but a typical .gitignore file for Vue would look as follows.
# mac only
.DS_Store

# folders
node_modules
/dist

# local env files
.env.local
.env.*.local

# log files
npm-debug.log*
yarn-debug.log*
yarn-error.log*
pnpm-debug.log*

# editors and their files
.idea
.vscode
*.suo
*.ntvs*
*.njsproj
*.sln
*.sw?
6. The babel.config.js file.
Babel converts modern Javascript into backwards compatible versions so that it can run in current and older browsers. It can transform syntax, add polyfills, etc.
This file is Babel’s configuration file. We don’t really need to worry about Babel or its config.
7. The package.json file.
This file stores all kinds of information about the project such as the dependencies and devDependencies we mentioned earlier.
- The “dependencies” are the npm packages required for the application to work, like the Vue API. They are included in the final build.
- The “devDependencies” are the npm packages required for the development environment to work, like the development server. They are not included in the final build.
In here we can also see an option called “scripts”. These are the scripts we run to start the development server, perform linting operations, or build the final product.
In these key:value pairs, the key is the keyword we need to use when running the npm run command, and the value is the Vue CLI script that gets executed.
There may also be other configuration options, like the linter.
8. The README.md file.
This is a simple readme file in markdown and is used by Git repository hosting services like GitHub as a description for the project.