Svelte.js 3 HTTP Requests with the Fetch API Tutorial
In this tutorial we learn how to handle HTTP requests in Svelte with Javascript's Fetch API.
We also cover GET, POST, PUT, PATCH and DELETE requests, as well as how to handle a loading state with 'else' or 'await' blocks.
- Lesson Video
- Lesson Project
- The Javascript Fetch API
- How to receive data with an HTTP GET request in Svelte
- How to handle a loading state in Svelte with a looping 'else' block
- How to handle a loading state in Svelte with an 'await' block
- How to send data with an HTTP POST request in Svelte
- Updating data in Svelte: PUT & PATCH
- How to delete data with an HTTP DELETE request in Svelte
Lesson Video
If you prefer to learn visually, you can watch this lesson in video format.
Lesson Project
If you want to follow along with the examples in this lesson, you’ll need a Svelte app that was cloned with degit or scaffolded with Vite
If you already have an app from previous lessons, you can use that instead.
We want the focus of this lesson to be how to use the Fetch API with Svelte, we don’t want to worry about setting up an API ourselves. So, for our API endpoint we’ll be using JSONPlaceholder .
JSONPlaceholder is a free online REST API with fake data, we can think of it as a fake storage solution that we can use for learning and testing.
The Javascript Fetch API
The Fetch API is the modern way to handle HTTP requests with Javascript. It has a more powerful and flexible feature set than the older XMLHttpRequest .
It uses the fetch method to perform its operations.
This method takes two arguments.
- The path of the resource we want to fetch.
- An object with request properties .
fetch('https://example.com/resource.ext', { request-options })For the request options, we’ll typically only really care about the method, headers and body options.
- method is a string with the type of HTTP request we send, like GET (retrieving data) or POST (sending/saving data).
- headers is an object that allows us to specify the type of content we are working with, among other things.
- body is also an object with the data we want to process.
fetch('https://example.com/resource.json', {
  method: 'POST',
  headers: {
    'Content-Type': 'content/type'
    // like application/json or text/xml
  },
  body: {
    // Example: Update JSON file with
    //          local data properties
    postTitle:  title,
    postAuthor: author
    // etc.
  }
})
When fetch gets data, it returns a promise with a Response object. So, we can chain then and catch blocks to it.
fetch('resource')
  .then()
  .catch()
How a Javascript promise works
Because we’re working with a server and a dataset that might be big, processing the fetch method may take some time.
A promise is Javascript’s way of saying: We promise to process this at some point.
The application won’t stop and wait for the promise to complete. While it’s running, Javascript will continue down the document and execute code.
// while fetching
fetch('resource')

// execute other
// code as well
some_method()
As mentioned before, we can chain then and catch blocks to a promise.
The then block is a way of saying: When the promise is fulfilled, then do something.
And if we encounter an error at any point during the operation, we handle it in the catch block.
fetch('resource')
  // promise fulfilled
  .then(
    // process data
  )
  // and
  .catch(
    // catch any errors
    // that may arise
  )
The then and catch blocks take a callback as argument.
fetch('resource')
  .then(response => {
    // process data
  })
  .catch(error => {
    console.error('Panic at the disco:', error);
  })
tip We can chain more than one then blocks to the statement if we need to.
How to receive data with an HTTP GET request in Svelte
When we want to get data, we only need to specify the resource url.
fetch('https://example.com/resource.ext')In most cases when we’re retrieving data, we’ll want to do it when a page loads.
In the Lifecycle Hooks lesson we mentioned that the onMount hook is the best place to perform HTTP requests. We can perform the HTTP request inside the lifecycle hook.
<script>
  import { onMount } from 'svelte'

  onMount(() => {
    fetch('https://example.com/resource.ext')
  })
</script>
As an example, let’s fetch all the blog posts from JSONPlaceholder in our root App component. The resource path we want to use is https://jsonplaceholder.typicode.com/posts .
tip We can see the data we are able to access from the JSONPlaceholder website under the “Routes” section.
<script>
  import { onMount } from 'svelte'

  onMount(() => {
    fetch('https://jsonplaceholder.typicode.com/posts')
  })
</script>
As mentioned earlier, the method returns a promise containing a response object. But this is just the HTTP response, not the actual JSON content.
We’ll need to extract the JSON content in a then block with the json method. This method will parse the content and return a promise with the result which we can use as regular Javascript objects.
For now, let’s log the result to the console.
<script>
  import { onMount } from 'svelte'

  onMount(() => {
    fetch('https://jsonplaceholder.typicode.com/posts')
      .then(response => response.json())
      .then(result => console.log(result))
  })
</script>
If we run the example in the browser and take a look at the Console tab of the developer tools, we’ll see an array of 100 post objects.
So we’ve successfully fetched and processed the post data from the API.
Logging it to the console isn’t very useful though, so let’s store the objects in a local array and define a loop to output them in the markup.
<script>
  import { onMount } from 'svelte'

  let posts = []

  onMount(() => {
    fetch('https://jsonplaceholder.typicode.com/posts')
      .then(response => response.json())
      .then(result => posts = result)
  })
</script>

{#each posts as post (post.id)}
  <h2>({post.id}) {post.title}</h2>
  <p>{post.body}</p>
  <hr>
{/each}
If we run the example in the browser, we’ll see all 100 posts on the page.
How to handle a loading state in Svelte with a looping 'else' block
Sometimes, data from a server can a while to fetch. This could happen for many reasons like a slow internet connection from the user, a slow server, a large dataset etc.
We should keep the user experience in mind and show them in some way that the data is still loading. We could use a simple “Loading…” message, animated loading spinners, or ghost elements.
To do that, we’ll use the else feature of the each iteration block. It works the same as a regular else conditional block but will render until there is data to display.
{#each list as alias}
  <!-- display data -->
{:else}
  <!-- display until data ready -->
{/each}
To demonstrate, let’s add an else to the loop in our example to display a simple “Loading…” message.
<script>
  import { onMount } from 'svelte'

  let posts = []

  onMount(() => {
    fetch('https://jsonplaceholder.typicode.com/posts')
      .then(response => response.json())
      .then(result => posts = result)
  })
</script>

{#each posts as post (post.id)}
  <h2>({post.id}) {post.title}</h2>
  <p>{post.body}</p>
  <hr>
{:else}
  <h2>Loading...</h2>
{/each}
Because we’re working on the localhost, the loading may be too fast to see the message.
We can simulate a slow connection in the browser’s developer tools by going to the Network tab and selecting Slow 3G from the Throttling dropdown menu.
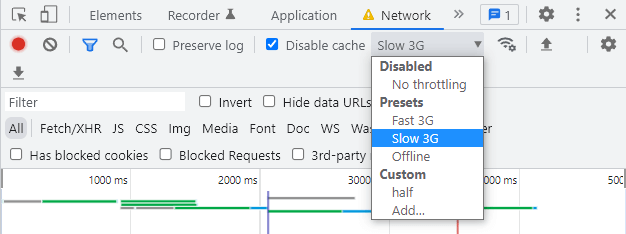
If we refresh the page, we should see the loading message for a few seconds.
How to handle a loading state in Svelte with an 'await' block
Svelte provides us with the await/then block to handle promises directly in the markup. We can use this block to handle the loading state.
The await block takes the promise we want to handle and expects the code we want to execute in its body.
The then block takes the returned response and expects the code we want to execute when the promise has been resolved.
{#await promise}
  <!-- promise has not been resolved -->
{:then response}
  <!-- promise has been resolved -->
{/await}
To demonstrate, let’s move the logic out of the onMount lifecycle hook into a function that returns the fetch .
We’ll comment out the part where we assign the response result to the posts array because the then block will take that returned data. From there we can use it to loop over the posts and display their contents.
<script>
  function getPosts() {
    return fetch('https://jsonplaceholder.typicode.com/posts')
      .then(response => response.json())

      // the "then" block will use this
      // .then(result => posts = result)
  }
</script>

{#await getPosts()}
  <h2>Loading...</h2>
{:then posts}
  {#each posts as post (post.id)}
    <h2>({post.id}) {post.title}</h2>
    <p>{post.body}</p>
    <hr>
  {/each}
{/await}
If we run the example in the browser, it will display the loading message until the posts have been retrieved.
If that happens too fast, we can simulate a slow connection in the browser’s developer tools by going to the Network tab and selecting Slow 3G from the Throttling dropdown menu.
How to send data with an HTTP POST request in Svelte
When we send data, we need to specify additional options for the fetch method as a second argument.
- Request method . We’re sending data so the method option should be set to “POST”.
- Request headers . The only required header option is the “Content-Type”, which allows us to specify the type of media we’re sending in a specific format.
- Request body . This is where we specify the data we want to send and how it should be stored by the receiving storage layer.
fetch('path-to-end-point',{
  method:  'POST',
  headers: {
    'Content-Type': 'media-type'
  },
  body: {
    // data we want to send
  }
})
To demonstrate, we’ll set up a new example in the root App component to take input from a form for the same data that JSONPlaceholder expects. We’ll also add some styling to make the example easier to use.
<script>
  const postData = {
    userId: '',
    title: '',
    body: ''
  }

  function formHandler(event) {
    event.preventDefault()

  }
</script>

<section>
  <form>
    <div>
      <label for="userId">UserID:</label>
      <input type="text" id="userId" bind:value={postData.userId}>
    </div>
    <div>
      <label for="title">Title: </label>
      <input type="text" id="title" bind:value={postData.title}>
    </div>
    <div>
      <label for="body">Body: </label>
      <textarea id="body" rows="6" cols="22" bind:value={postData.body}></textarea>
    </div>
    <button on:click="{formHandler}">Create Post</button>
  </form>
</section>

<style>
  section{height:100vh;display:grid;justify-items:center;padding-top:40px}
  div{margin:24px auto}
  label{font-weight:bolder;display:block;margin-bottom:4px}
</style>
Now we’re ready to add fetch in the custom formHandler function that will be executed when the form is submitted.
JSONPlaceholder allows us to use the same /posts/ resource path that we used with the GET request, so we can add it as the first argument.
formHandler() {
  fetch('https://jsonplaceholder.typicode.com/posts/')
}
As the second argument, we’ll use the following values for the request properties.
- The request method is “POST”
- The content type is “application/json”.
- The content body is data we get from the form, assigned to its corresponding key in the JSON document.
formHandler() {
  fetch('https://jsonplaceholder.typicode.com/posts/',{
    method:  'POST',
    headers: {
      'Content-Type': 'application/json'
    },
    body: {
      userId: userId,
      title:  title,
      body:   body
    }
  })
}
There’s a problem though, the data in the body option is a Javascript object. Javascript objects and JSON object literals are not the same. A JSON object literal cannot be an object because JSON is a string format.
So we’ll need to convert our Javascript object into a JSON object literal with the JSON.stringify method.
All we have to do is specify an object we want to convert as the argument for the stringify method. In our case, that’s the object in the body option.
formHandler() {
  fetch('https://jsonplaceholder.typicode.com/posts/',{
    method:  'POST',
    headers: {
      'Content-Type': 'application/json'
    },
    body: JSON.stringify({
      user_id: userId,
      title:   title,
      body:    body
    })
  })
    .then(response => response.json())
    .then(result => console.log(result))
}
When we send data to JSONPlaceholder, it doesn’t actually add the data, it only fakes adding it. If we log it to the console, we should see a post id of 101.
<script>
  const postData = {
    userId: '',
    title: '',
    body: ''
  }

  function formHandler(event) {
    event.preventDefault()

    fetch('https://jsonplaceholder.typicode.com/posts/',{
      method:  'POST',
      headers: {
        'Content-Type': 'application/json'
      },
      body: JSON.stringify({
        user_id: userId,
        title:   title,
        body:    body
      })
    })
      .then(response => response.json())
      .then(result => console.log(result))
  }
</script>

<section>
  <form>
    <div>
      <label for="userId">UserID:</label>
      <input type="text" id="userId" bind:value={postData.userId}>
    </div>
    <div>
      <label for="title">Title: </label>
      <input type="text" id="title" bind:value={postData.title}>
    </div>
    <div>
      <label for="body">Body: </label>
      <textarea id="body" rows="6" cols="22" bind:value={postData.body}></textarea>
    </div>
    <button on:click="{formHandler}">Create Post</button>
  </form>
</section>

<style>
  section{height:100vh;display:grid;justify-items:center;padding-top:40px}
  div{margin:24px auto}
  label{font-weight:bolder;display:block;margin-bottom:4px}
</style>
If we run the example in the browser and fill in and submit the form, we’ll see an object in the console log with a post id of 101.
Updating data in Svelte: PUT & PATCH
Updating data is almost the same as sending data.
Depending on the API we’re working with, the resource path may or may not be the same as sending data. For updating, we’ll also need at least the method , headers and body request options.
The fetch API allows us to update data in two ways.
- We use PUT when we want to update all data.
- We use PATCH when we want to update only specific parts of the data.
How to replace update data with an HTTP PUT request in Svelte
As mentioned above, we use the PUT request when we want to update all data. In our case that’s all the keys in the JSON object literal.
To keep the example simple, we’ll hardcode the values we want to PUT . JSONPlaceholder also requires us to specify the post id we want to update in the resource url.
note It’s important that we specify a value for all the keys in the JSON object literal when using PUT as the request method. If we omit a key, that key’s value will automatically be assigned the value of NULL.
<script>
  function formHandler(event) {
    event.preventDefault()

    fetch('https://jsonplaceholder.typicode.com/posts/1',{
      method:  'PUT',
      headers: {
        'Content-Type': 'application/json'
      },
      body: JSON.stringify({
        userId: 1,
        id:     1,
        title:  'New post title',
        body:   'Lorem ipsum dolor'
      })
    })
      .then(response => response.json())
      .then(result => console.log(result))
  }
</script>

<button on:click="{formHandler}">PUT Update Post</button>
If we go to the browser and click on the ‘Update Post’ button, we should see an object with the data we just updated in the browser’s console.
{
  "userId": 1,
  "id": 1,
  "title": "New post title",
  "body": "Lorem ipsum dolor"
}
How to partial update data with an HTTP PATCH request in Svelte
If we only want to update a single piece of data in an entry set, we can use PATCH as the request method.
For example, let’s say we only want to change the “title” key of our blog post. We don’t want to update anything else.
<script>
  function formHandler(event) {
    event.preventDefault()

    fetch('https://jsonplaceholder.typicode.com/posts/1',{
      method:  'PATCH',
      headers: {
        'Content-Type': 'application/json'
      },
      body: JSON.stringify({
        title: 'New post title'
      })
    })
      .then(response => response.json())
      .then(result => console.log(result))
  }
</script>

<button on:click="{formHandler}">PATCH Update Post</button>
If we go to the browser and click on the button, we should see an object with the data we just updated in the browser’s console.
{
    "userId": 1,
    "id": 1,
    "title": "New post title",
    "body": "quia et suscipit\nsuscipit recusandae consequuntur expedita et cum\nreprehenderit molestiae ut ut quas totam\nnostrum rerum est autem sunt rem eveniet architecto"
}
But this time, only the title will be updated. The other post content, like the body, will still have its original value.
How to delete data with an HTTP DELETE request in Svelte
To delete data, all we have to do is specify the DELETE request method on the resource path we want to delete.
For example, if we want to delete post number 1 in JSONPlaceholder, we can specify /posts/1 as the resource path in the fetch method.
fetch('https://jsonplaceholder.typicode.com/posts/1',{
  method: 'DELETE'
})
To demonstrate, let’s change our example to delete post number 1 from JSONPlaceholder.
<script>
  function formHandler(event) {
    event.preventDefault()

    fetch('https://jsonplaceholder.typicode.com/posts/1',{
      method:  'DELETE'
    })
      .then(response => response.json())
      .then(result => console.log(result))
  }
</script>

<button on:click="{formHandler}">Delete Post</button>
If we go to the browser and click on the “Delete Post” button, we should see an empty object in the console. This indicates that the post was successfully deleted.
tip JSONPlaceholder only mimics the delete request, so if we attempt to GET the post, it will still exist. On a real server, the data is deleted.