Redis Development Environment Setup Tutorial
In this Redis tutorial we learn how to set up a development environment natively on Linux, Windows and Mac or with Docker.
Redis Environment
Redis only runs on Linux operating systems like Ubuntu. Luckily, we have some options to create a local development environment for other operating systems like Windows.
- Docker
- Virtual Machine: Windows Subsystem for Linux
- Virtual Machine: Linux on Windows/Mac
- Redis for Windows
We recommend Docker if you don’t have a Linux operating system. Docker is faster than traditional virtual machines and supports many other technology stack images which will be useful in your career as a developer.
In this tutorial course we’ll be using Redis with Docker, but the commands for Redis will be the same regardless of the environment you use.
Install Redis on Ubuntu
There are two ways to install Redis on Ubuntu.
1. Install Redis via the terminal
Press Ctrl+T to open you terminal and execute the following commands.
sudo apt-get update
sudo apt-get install redis-server
This will install Redis on your machine.
To start Redis, execute the following command in the terminal.
redis-serverTo use Redis, open the Redis CLI with the following command.
redis-cliThe prompt will now show redis and a bunch of numbers.
redis 127.0.0.1:6379>The numbers are the machine’s local IP address (127.0.0.1) and the port on which the Redis server is running (6379).
Let’s test Redis quickly with the following command.
pingRedis should respond with the following message.
PONGThe response from Redis means it’s working and has been successfully installed on your machine.
2.\ Install Redis Desktop Manager
The Redis Desktop Manager is a commercial software application to manage your Redis database.
The desktop manager will give you a UI to manage your Redis keys and data easily on Windows, Mac, IPad and 6 flavors of Linux.
Please note that the Redis Desktop Manager app is not free and requires either a one-time fee, or monthly subscription.
Redis with Docker
The easiest way to get started with Redis if you don’t have a Linux operating system is with Docker.
Docker is similar to a virtual machine and works with ‘images’ that contain everything you need to run an application like Redis - the code or binary, runtimes, dependencies, and any other filesystem objects required.
If you already have docker installed, skip to the Redis Docker Image section of this lesson. Otherwise, follow the steps below to setup a Docker environment.
The following process will require one or more system restarts. It’s a good idea to bookmark this tutorial to easily access it again. You can also drag the lock icon, next to the URL in your browser, to the desktop to create a shortcut.
Docker Environment
Before we can use Docker, we need to install it on our system first.
1. Download the ‘stable’ installer from the Docker Desktop Downloads page .
You may have to create a Docker account before the download becomes available. If so, make a note of this account as you will need it during the setup.
2. During the installation you may be asked to authorize Docker.app. This helps Docker to install networking components and manage Hyper-V VMs.
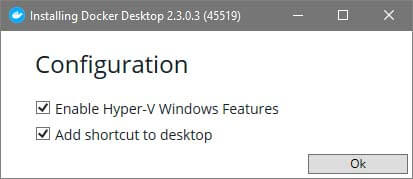
3. After the installation you will be asked to “Enable Hyper-V Features”. Just click Ok.
4. Once the installation is complete, you can launch Docker from the desktop shortcut or the Start menu.
The first startup will take longer because Docker needs to setup all initial settings.
If you’re on Windows and receive the following error when launching Docker, it means that Hyper-V hasn’t been enabled.
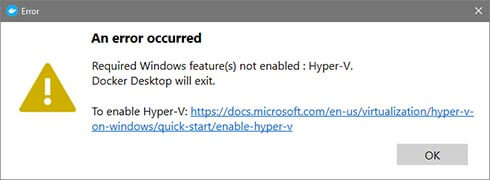
Follow one of the steps below to enable Hyper-V or see Microsoft's Official Documentation for more information.
Settings:
- Right-click on the Windows button and select ‘Apps and Features’.
- Select Programs and Features on the right under related settings (You may have to scroll down).
- Select Turn Windows Features on or off.
- Select Hyper-V and click OK.
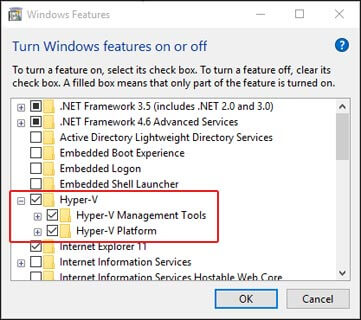
When the installation has completed you will be asked to restart your computer.
Powershell:
- Click on Start and type “powershell”. Right-click on the Powershell entry and select Run as administrator.
- Type in the following command and press Enter to enable Hyper-V.
Enable-WindowsOptionalFeature -Online -FeatureName Microsoft-Hyper-V -AllIf you’re asked to restart Windows, type Y and press Enter.
Redis Docker Image
Now that we have Docker installed and set up, we can install and setup the Redis image.
A Docker image is a private file system just for your container. It provides all the files and code your Docker container needs.
1. Launch Docker (if it’s not already running) and a new terminal/command prompt and execute the following command to install the Redis Docker image.
docker pull redis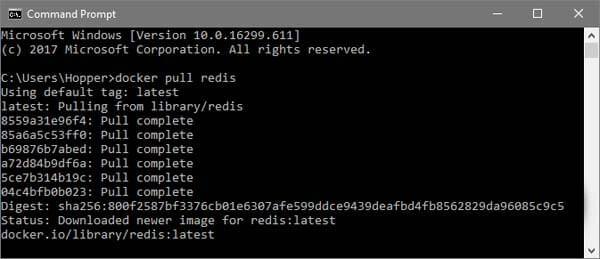
2. Next, start a Redis instance on Docker with the following command.
docker run --name test-redis -p 6379:6379 -d redisThis sets up the instance name as ‘test-redis’ and uses the default Redis port at 6379.
You may have to authorize the instance with your firewall.
We use this command structure each time we want to create a new Docker instance.
docker run --name <container-name> -p <port>:<port> -d redisThe port has to be mentioned twice when we want to connect to it from an external app like Node.js.
If you switch over to Docker Desktop, it should show the instance running.
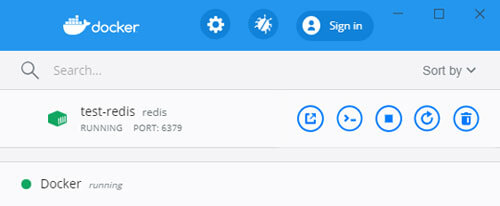
3. To connect to the Redis CLI, execute the following command in your terminal/command prompt.
docker exec -it test-redis redis-cliThis will open the Redis CLI.
The command structure to open the Redis CLI is as follows.
docker exec -it <container name> redis-cliThe prompt will now show the word ‘redis’ and a bunch of numbers.
redis 127.0.0.1:6379>The numbers are the machine’s local IP address (127.0.0.1) and the port on which the Redis server is running (6379).
Let’s test Redis quickly with the following command.
pingRedis should respond with the following message.
PONGStarting Redis on Docker
In the event that you need te start Docker and connect to Redis, you can follow the steps below.
1. Start Docker, open its Dashboard and start the Redis image from the buttons on the right.
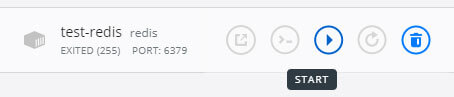
If the Start button isn’t available, the image is already running.
2. Once the image is running, open your Terminal or Command Prompt and connect to the Redis CLI with the following command.
docker exec -it test-redis redis-cliWhere ‘test-redis’ is the name of the image.
The terminal console will show the following local IP and port, which means you are connected to Redis and can start adding data.
127.0.0.1:6379>That’s it, you’re now ready to start using Redis and you can skip directly to the next lesson .
Windows Subsystem for Linux
Any Windows 10 version 1709 (2017-09, Fall Creators Update ) supports the Windows Subsystem for Linux (WSL).
WSL allows us to run at least a half-dozen different flavors of Linux, and we can run Redis on top of them.
Before we try to setup WSL, let’s check which version of Windows you're running .
- On your keyboard, press the Windows logo key + R, type “winver”, then select OK.
- A new window will appear with your version information. This number needs to be 1709 or higher.

If your Windows version does not support WSL, you can update it or use one of the other options in this tutorial.
Next, we’ll use Powershell and setup WSL on your system.
- Click on Start and type “powershell”. Right-click on the Powershell entry and select Run as administrator.
- Type in the following command and press Enter.
Enable-WindowsOptionalFeature -Online -FeatureName Microsoft-Windows-Subsystem-LinuxA prompt may ask you to restart your system.
The next step is to download and install one of the official Linux distributions from the Microsoft Store .
For example, you can choose Ubuntu 20 and then follow the steps to install Redis on Ubuntu in this lesson.
If you encounter any problems, or need more information, visit the official documentation on installing Linux on Windows .
Redis on Win/Mac with a virtual machine
If you don’t want to use Docker or WSL, you can add a full blown virtual machine on your system with the free VirtualBox app.
- Point your browser to the VirtualBox downloads page and choose the package for your operating system.
- Install VirtualBox on your system.
- Find and download the Linux distribution of your choice, for example Ubuntu .
Now that we have VirtualBox and a Linux distro, we can setup our virtual machine.
- Launch VirtualBox and click on the New button.
- Give your VM a name and choose the Linux distro from the list.
- Allocate memory (RAM) to your VM or use the recommended amount.
- Create a virtual disk. This serves as the hard disk of the virtual Linux system. It is where the virtual system will store its files.
- Use a VDI (VirtualBox Disk Image) for the virtual disk type.
- If you have limited space available, choose “Fixed” size. Otherwise choose “Dynamically allocated”.
- The recommended size is 10 GB. However, we suggest giving it more space if possible. 15-20 GB is preferable.
Now you’re ready to boot into the new VM with the Start button.
VirtualBox should automatically detect the Linux ISO. If it doesn’t click on the folder icon and navigate to where the image was downloaded to.
The first run will require you to install the Linux distro from the ISO you downloaded. The installation may ask you to “Erase Disk and install X”. It’s safe to allow because it’s working in a virtual environment.
When your installation is done, you can simply install Redis by following the stepsinstall Redis by following the steps earlier in the lesson.
Redis for Windows
Tomasz Poradowski generously created a native port of Redis for Windows on Github.
While the project is actively maintained, it only supports up to Redis v5.09 at this time, which is not the latest version.