MongoDB Sharding Tutorial
In this MongoDB tutorial we learn how to distribute data accross multiple servers in a process called sharding.
We cover how sharding clusters, keys and chunks work and how to set up a sharded cluster on a localhost.
What is Sharding
Sharding is the process of distributing data across multiple hosts.
In MongoDB, sharding is achieved by splitting large data sets into small data sets across multiple MongoDB instances.
How sharding works
Sharding is typically done for deployments with very large data sets and high throughput (CRUD) operations.
Databases with large data sets or high throughput can stress the capacity of a single server. For example, if a working set size is larger than the system’s RAM, it will stress the I/O capacity of its disks, and large amounts of queries can quickly exhaust the CPU capacity of a server.
There are two scaling solutions to address system growth:
1. Vertical Scaling.
Vertical scaling means that we increase the hardware capabilities of a single server by upgrading components like the CPU, RAM and storage space.
Because of limitations in current technology and cost constraints, there is a practical limit for vertical scaling. Even cloud-based providers have hard limits based on their available hardware configurations.
2. Horizontal Scaling.
Horizontal scaling means that we divide the dataset into multiple servers and distribute the database load among each. We can then simply add more servers to increase database capacity as required.
Distributing the load over multiple servers reduces the strain on the required hardware resources. Each machine only needs to handle a subset of the overall workload, so it doesn’t need to be very powerful.
In fact, it can generally provide better effeciency than a single high-speed, high capacity server.
The benefit is that as our data increase, we simply need to add more servers. This leads to lower overall cost and it provides redundancy in case of failure.
On the other hand, horizontal scaling increases the complexity in both infrastructure and maintenance.
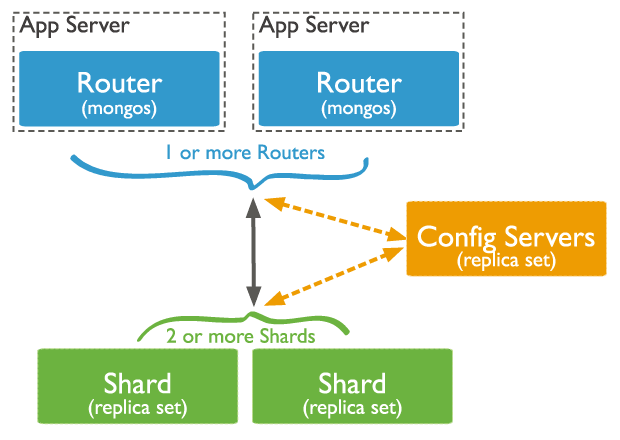
Sharded Cluster
MongoDB sharding works by creating a cluster of MongoDB instances consisting of at least three servers. That means sharded clusters consist of three main components:
1. A shard.
A shard is a single MongoDB instance that holds a subset of sharded data.
The combination of multiple shards creates a complete data set. For example, a 1 TB data set can be broken into four shards, each containing 250 GB of data.
2. Config servers.
Configuration servers store metadata and configuration setting for the whole cluster of shards.
Config servers also work as replica sets .
3. Mongos instance.
The mongos instance acts as the query router responsible for routing client requests to the correct shard.
- The app communicates with the routers about the query it wants to execute.
- The mongos instance checks the config server to see which shard contains the data set to send the query to that shard.
- The result is returned to the application.
The offocial MongoDB documentation explain the relationships in more depth.
Shard Keys
Sharding in MongoDB is done at the collection level. A shard key is used to distribute the collection’s documents across all the shards.
The key consists of one or more fields in every document and is immutable, which means it cannot be changed after sharding.
A shard key can have a direct impact on the cluster’s performance and can lead to bottlenecks in applications, but we can mitigate this.
Before sharding a collection, the shard key should be based on:
- The schema of the data set
- How the data set is queried
Chunks
A chunk is a subset of shared data.
Shared data is separated into chunks that are distributed across shards in a shared cluster. Each chunk has an upper and lower range based on the shard key.
A balancer for each cluster handles the chunk distribution. The balancer runs as a background job and distributes the chunks as needed for an even balance across all shards.
How to set up a sharded cluster
Now that we have all the concepts out of the way, let’s set up our sharding.
The official documentation also has an in-depth tutorial on setting up a sharded cluster .
For sharded clusters we have to use a mongos instance. We can connect and query a sharded cluster (mongos instance) in almost the same way that we do with a mongod instance.
We know that mongod is the instance that runs the data store, and mongos is the router service for a cluster. Both are daemons that run in the background.
For a sharded cluster we will need the following.
- One or more mongod instances that are running as the shards.
- 3 mongod instances running as config servers (in a test environment we may use only 1).
- 1 or more mongos instances which are the routers. These are the endpoints we connect to from the client.
Based on the information from the config servers, a router decides which shards it needs to query. It then handles the sorting and merging of the results before returning the query results.
Below are the steps we follow to set up a sharded cluster.
- Configure the config server
- Configure a shard
- Configure the query router
How to configure the config server
Let’s start by creating the required config database directory.
We have to create a separate configdb folder in our _\data_ directory.
By default, MongoDB will look for this directory in the following location.
C:\data\First, open a terminal or command prompt. Windows users will have to Run as administrator for admin privileges to create files and directories.
Next, let’s navigate to the data directory.
cd C:\dataNow let’s create a new folder with the name ‘configdb’.
md configdbsudo mkdir configdbMac and Linux users may be asked to enter a password when running the command above.
We can confirm that the directory exists by either navigating to it manually, or using the following command.
dirlsNext, let’s start the config server.
Navigate to the _\Server\version\bin_ directory and start a new mongod instance with the following options as flags.
- --configsvr
- --replSet replica_set_name
- --bind_ip host_name_and_port_number
We don’t need to specify a port number explicitly in this case because adding the --configsvr flag automatically binds to port 27019 by default.
cd C:\Program Files\MongoDB\Server\4.4\bin

// then

mongod --configsvr --replSet ConfigReplSet --bind_ip localhost
Finally, let’s connect to the config server.
Open a new terminal/command prompt and navigate to the _\Server\version\bin_ directory and start a new mongo instance with the following host:port option.
cd C:\Program Files\MongoDB\Server\4.4\bin

// then

mongo localhost:27019
From here we need to initiate the server.
We will initiate the server with the default settings by using the rs.initiate() method.
rs.initiate({
    "_id" : "ConfigReplSet",
    "configsvr" : true,
    "members" : [
        { "_id" : 0, "host" : "localhost:27019" }
    ]
})
The important part in the example above is the configsvr field, which must be set to true.
We can close this terminal/command prompt or press Ctrl+C to use it in the next step.
How to configure a shard
Let’s start the shard server.
Navigate to the _\Server\version\bin_ directory and start a new mongod instance with the following options as flags.
- --shardsvr
- --replSet different_replica_set_name
- --bind_ip host_name_and_port_number
We have to ensure that our replica set name isn’t the same as the config server’s one.
We don’t need to specify a port number explicitly in this case either because adding the --shardsvr flag automatically binds to port 27018 by default.
cd C:\Program Files\MongoDB\Server\4.4\bin

// then

mongod --shardsvr --replSet ShardReplSet --bind_ip localhost
Finally, connect to the shard server.
Open a new terminal/command prompt and navigate to the _\Server\version\bin_ directory and start a new mongo instance with the following host:port option.
cd C:\Program Files\MongoDB\Server\4.4\bin

// then

mongo localhost:27018
From here we need to initiate the server as well.
Once again, we need to initiate the replica set with the rs.initiate() method.
rs.initiate({
    "_id" : "ShardReplSet",
    "members" : [
        { "_id" : 0, "host" : "localhost:27018" }
    ]
})
This time we leave out the configsvr option.
We can close this terminal/command prompt or press Ctrl+C to use it in the next step.
How to configure the query router
In this step we’ll configure the query router.
Navigate to the _\Server\version\bin_ directory and start a new mongos instance with the following options as flags.
- --configdb config_replica_set_name/config_set_address:port --bind_ip hostname
Again we don’t need to specify a port number explicitly because it automatically binds to port 27017 by default.
cd C:\Program Files\MongoDB\Server\4.4\bin

// then

mongos --configdb ConfigReplSet/localhost:27019 --bind_ip localhost
At this point, the sharded cluster consists of the 2 mongod instances and the 1 mongos instance.
Lastly, we will connect a mongo instance to the mongos instance.
Open a new terminal/command prompt, navigate to the _\Server\version\bin_ directory and start a new mongo client instance that connects to the mongos query router at 127.0.0.1:27017.
cd C:\Program Files\MongoDB\Server\4.4\bin

// then

mongo localhost:27017
We will use this mongo instance in the next step.
How to add a shard to the cluster
Now we are going to add the shard we configured earlier to the cluster.
To do this we use the sh.addShard() method with the shard’s replica set name and address:port.
sh.addShard("ShardReplSet/localhost:27018")How to enable sharding
We have to explicitly enable sharding on a database with the sh.enableSharding() method.
sh.enableSharding("database_name")For example, if you wanted to create a database called ‘employee’ and enable sharding on it.
use employee

// then

sh.enableSharding("employee")
How to create a sharding dataset
As mentioned before, sharding in MongoDB is done at the collection level.
We need to have a collection and an index that will be used as the shard key. The data in the collection will be sharded using the shard key and the collection.
Let’s create a collection in the ‘employee’ database called ‘empCol’.
db.createCollection("empCol")Next, let’s create the index with the db.collection.createIndex() method. We will use ‘empid’ as the field and sort in ascending order.
db.empCol.createIndex({ "empid" : 1 })We cannot create an index on a collection that’s not sharded.
Next, we will add a document to the collection.
db.empCol.insertOne({ "empid" : 001 })Now that we have our collection ready, we can enable sharding for the ‘empCol’ collextion.
The first step is to make sure the index ‘empid’ is hashed to avoid any unexpected errors.
Luckily, MongoDB gives us a handy function called db.collection.ensureIndex() to make this process easy.
db.empCol.ensureIndex({ "empid" : "hashed"})Now we can enable Sharding with ‘empid’ as the shard key by using the sh.shardCollection() method.
For this method we specify the following.
- database.collection
- shard_key
sh.shardCollection("employee.empCol", { "empid" : "hashed" })