MongoDB Replication Tutorial
In this MongoDB tutorial we learn how to synchronize data across multiple servers with replica sets.
We cover how to set up and manage members of a replica set and how elections work.
What is Replication
Replication allows us to synchronize data across multiple servers.
Having multiple copies of our data provides us with many benefits like data safety and availability.
- Protection from single server loss, hardware failures and service interruptions.
- High availability. In most cases data can be available 24⁄7.
- No downtime for maintenance operations like backups.
- We can dedicate servers to specific services like distaster recovery, backup or reporting.
- We have extra copies to read from (read scaling).
How does replication work
MongoDB uses a replica set to achieve replication. A replica set is a group of mongod (Mongo server) instances that host the same data set.
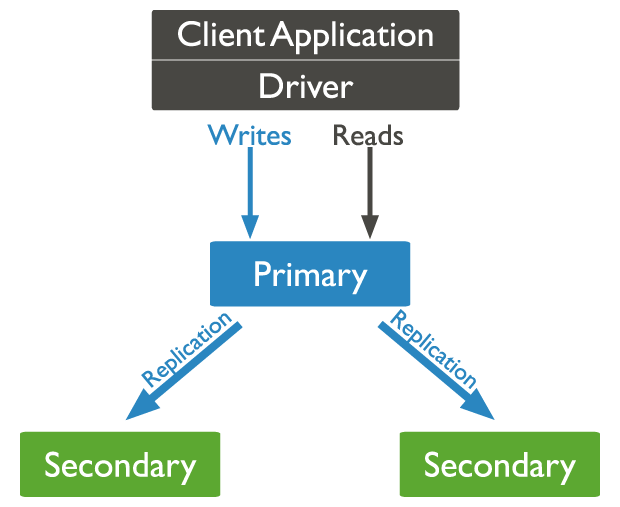
A replica set consists out of nodes. One node is a primary node that receives all write operations. Secondary nodes simply apply operations from the primary so that they have the same data set.
A replica set may have only a single primary node.
- A replica set is a group of 3 or more nodes, one of which is the primary node.
- Data replicates from the primary node to secondary nodes.
- In maintenance or automatic failover, a new primary node is established by election.
- When a failed node is recovered, it can join the replica set again but will work as a secondary node.
How to set up a replica set
To set up a replica set, we convert a standalone mongod (Mongo server) instance to a replica.
1. Shut down any running instances of mongod. by pressing Ctrl+C or by exiting the terminal/command prompt.
2. We start the server by adding the --replSet flag to the command and giving a name for our replica set instance.
--replSet instance_namecd C:\Program Files\MongoDB\Server\4.4\bin
// then
mongod --replSet rs0In the example above we create a new replica set with the name ‘rs0’.
3. Next, open a second terminal/command prompt and start a mongo (mongo database) instance.
cd C:\Program Files\MongoDB\Server\4.4\bin

// then

mongo
We have to initiate our replica set first, by using the rs.initiate() method.
rs.initiate()Because we didn’t specify a configuration, a default one will be used.
{
    "info2" : "no configuration specified. Using a default configuration for the set",
    "me" : "localhost:27017",
    "ok" : 1,
    "$clusterTime" : {
        "clusterTime" : Timestamp(1605513557, 1),
        "signature" : {
            "hash" : BinData(0,"AAAAAAAAAAAAAAAAAAAAAAAAAAA="),
            "keyId" : NumberLong(0)
        }
    },
    "operationTime" : Timestamp(1605513557, 1)
}
3.1 Optionally, we can also specify a document with config options, like the following.
rs.initiate({
    _id: "rs0",
    version: 1,
    members: [
        { _id: 0, host : "mongodb0.example.net:27017" },
        { _id: 1, host : "mongodb1.example.net:27017" },
        { _id: 2, host : "mongodb2.example.net:27017" }
    ]
})
3.2 We can check our replica set configuration with the rs.conf() method and we can check the status of the replica set with the rs.status() method.
3.3 The terminal/command prompt will also show us which replica set we’re working with as well as the node we’re in.
rs0:PRIMARY>

// or

rs0:SECONDARY>
Optionally, we can check if we’re using a primary node with the db.isMaster() method.
{
    "topologyVersion" : {
        "processId" : ObjectId("5fb2306ca76be3b7b6df805f"),
        "counter" : NumberLong(6)
    },
    "hosts" : [
        "localhost:27017"
    ],
    "setName" : "rs0",
    "setVersion" : 1,
    "ismaster" : true,
    "secondary" : false,
    "primary" : "localhost:27017",
    "me" : "localhost:27017",
    "electionId" : ObjectId("7fffffff0000000000000001"),
    ...
}
If the client is the primary node, the “ismaster” key will be set to true and the “secondary” key will be set to false.
It will also show the primary host name and port number, as well as the current client host name and port number.
How to add members to a replica set
To add another instance to a replica set we use the rs.add() method.
This method takes two arguments.
- host to specify the host and port number
- arbiterOnly to set the host as arbiter. Optional. Avoid setting more than one arbiter per replica set.
rs.add("hostname:port_number", arbiterOnly)rs.add("mongodb0.example.net:27017", true)
rs.add("mongodb1.example.net:27017")
rs.add("mongodb2.example.net:27017")How to temporarily disable a member from becoming primary
To make the current replica set member ineligible to become primary for a specified period of time, we use the rs.freeze() method.
This method takes one argument.
- seconds to specify the number of seconds the member will be frozen
rs.freeze(seconds)For example, if we wanted to stop the member from becoming primary for a minute, we would freeze it for 60.
rs.freeze(60)How to temporarily change a primary to a secondary
We can tell the primary node to become a secondary with the rs.stepDown() method.
After the primary steps down, any eligible secondaries will hold an election to become primary.
The step down doesn’t happen immediately however. If no electable secondary nodes are up to date with the primary, the primary will wait up to the secondaryCatchUpPeriodSec (default 10) for the secondary to catch up.
Once the secondary is available, the primary steps down to become a secondary and cannot become a primary again until the specified stepDownSecs has passed.
This method takes two arguments.
- stepDownSecs to specify the number of seconds before a stepped down secondary can become eligible for primary again.
- secondaryCatchUpPeriodSecs to specify the number of seconds a secondary is allowed to catch up to a primary.
rs.stepDown(stepDownSecs, secondaryCatchUpPeriodSecs)For example, if we want our primary node to step down for 60 seconds if an electable secondary can catch up within 10 seconds.
rs.stepDown(60, 10)How to remove a replica set member
MongoDB allows us to remove replica set members with the rs.remove() method.
This method takes one argument.
- host:port to specify the host name and port number
rs.remove(host_name : port_number)rs.remove("mongodb2.example.net:27017")In version 4.2 and above we can immediately drop all outgoing connections by running the dropConnections admin command on the remaining members of the set.
db.adminCommand({
    "dropConnections" : 1,
    "hostAndPort" : [
        "host_name:port"
    ]
})db.adminCommand({
"dropConnections" : 1,
"hostAndPort" : [ "mongodb2.example.net:27017" ]
})How replica set elections work
Replica sets hold elections to determine which member will become primary when one or more specific events occur.
- Initiating a set
- Adding a new node to the set
- Maintenance operations such as rs.stepDown()
- Secondary nodes losing connectivity to the primary for more than the configured timeout.
Every 2 seconds, members send pings (heartbeats) to each other. If the ping doesn’t return in 10 seconds, the other members will mark this node as inaccessible. MongoDB’s election algorithm will make a “best-effort” attempt to have a secondary with the highest priority in place.
A replica set may have 50 members, of which 7 may vote. These voting members also have a priority, set in its configuration, which is used to determine which secondary will become primary.
It’s important to note that we should not use votes to control which member will become a primary. Instead we should modify the priority option in the config.
We only alter the number of votes in exceptional cases, for example to permit more than 7 voting members.
Non-voting members have 0 votes and must have a priority of 0.