MongoDB Development Environment Setup Tutorial
In this tutorial we learn how to set up a development environment for MongoDB on Windows, Linux or macOS.
Development Environment
In this course we will be using the command line to learn and interact with MongoDB.
Using the command line is great for learning because we don’t have to worry about other complexities, like learning a new user interface. The command line is also heavily used in MongoDB, especially with self-hosted solutions.
How to set up MongoDB on Windows
Follow these steps to install MongoDB Community Edition using the MongoDB Installer wizard.
The installation process installs both the MongoDB binaries as well as the default configuration file.
It’s worth it to note that MongoDB does not support the Windows Subsystem for Linux (WSL).
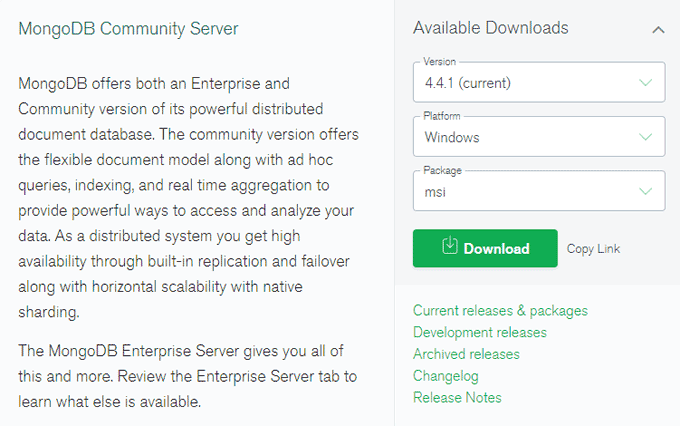
1. Point your browser to the official MongoDB download page and download the MongoDB Community .msi installer.
If it didn’t auto-detect your Windows operating system, follow the steps below.
- In the Version dropdown, select the version of MongoDB to download
- In the Platform dropdown, select Windows
- In the Package dropdown, select msi
- Click Download
2. Find the downloaded file (by default, it will be in the Downloads directory) and double-click the .msi file to start the installation.
3. The installation wizard will guide you through the setup of both MongoDB and MongoDB Compass (The GUI).
- You can choose between the Complete or Custom setup type. We recommend the Complete setup option as it will install MongoDB and its tools to the default location.
- From version 4.0, you can set up MongoDB as a Windows service during the install (recommended).
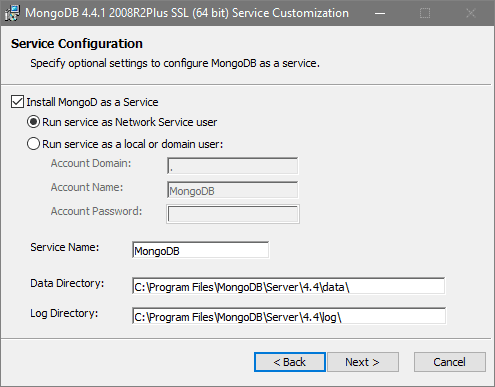
Select Install MongoD as a Service MongoDB as a service. - If you want MongoDB Compass installed, leave it selected.
- When ready, click Install.
The wizard may ask for permission to reboot your computer after the installation. If you’ve chosen Yes it will ask you to confirm the restart once the setup has finished.
If you have any trouble with the installation, you can visit the official documentation on how to install MongoDB on Windows .
MongoDB requires a data folder to store its files so we need to set that up next.
1. Click on the Windows button and type ‘cmd’ and hit Enter. Depending on your access level, you may need to Run as administrator.
In your Command Prompt terminal, navigate to the main drive with the following command.
cd ../..The command above will move you up two directories from C:\WINDOWS\system32 to C:.
In Windows, when running the command prompt as an administrator, you will start in C:\WINDOWS\system32\, otherwise you’ll start in C:\Users\USERNAME.
You could also cd into C:\ directly with the following command.
cd C:\If your main drive letter is something different, like ’D’, then simply change it in the command above.
2. Now run each of the following commands to create the required directories.
md data

md data\db
The commands above will create the following directories on your computer.
- C:\data
- C:\data\db
3. Next we need to set the dbpath in Mongo by running the following commands.
First, navigate into the ‘bin’ directory.
cd Program Files\MongoDB\Server\4.4\binWhere 4.4 is your version number.
Next, set the dbpath.
mongod --dbpath "C:\data"The dbpath only has to be set once. Next time you run ‘mongod’ you can simply use the following command.
mongodYou always have to run the server (‘mongod’) before running the database (‘mongo’).
Let’s quickly test that everything has installed correctly. Open another Command Prompt window and execute the following commands.
cd C:\Program Files\MongoDB\Server\4.4\bin

mongo
You should see the following, or similar, output from the terminal.
MongoDB shell version v4.4.1
connecting to: mongodb://127.0.0.1:27017/?compressors=disabled&gssapiServiceName=mongodb
Implicit session: session { "id" : UUID("bd4f2258-2bd2-4606-a697-e4e0f738a76d") }
MongoDB server version: 4.4.1
If you see an error, it means you need to run the ‘mongod’ server in another Command Prompt window before you start the database.
Run the following command as a test that everything works okay.
db.test()The function above should return the following, or similar, output.
{
    "db" : "test",
    "collections" : 0,
    "views" : 0,
    "objects" : 0,
    "avgObjSize" : 0,
    "dataSize" : 0,
    "storageSize" : 0,
    "totalSize" : 0,
    "indexes" : 0,
    "indexSize" : 0,
    "scaleFactor" : 1,
    "fileSize" : 0,
    "fsUsedSize" : 0,
    "fsTotalSize" : 0,
    "ok" : 1
}
If you want to quit, you can use Ctrl+C or simply close the Command Prompt window.
That’s it, you’re ready to start learning MongoDB. You can skip to the next lesson where we discuss Data Modelling.
How to set up MongoDB on Mac
Follow these steps to install MongoDB Community Edition on macOS using the third-party brew package manager.
1. If you don’t already have it installed, go to the App Store and install XCode .
Apple’s XCode includes command-line tools that are required by brew and is available for free.
If you have it installed, please ensure you’re running the latest version.
2. Click the Launchpad icon in the Dock, type ‘Terminal’ in the search field, then click Terminal to launch the terminal.
3. OSX does not include the Homebrew brew package by default so if you don’t already have it installed, install Homebrew with the following command.
/bin/bash -c "$(curl -fsSL https://raw.githubusercontent.com/Homebrew/install/master/install.sh)"If you have any trouble with the installation, you can visit the official Homebrew installation instructions .
4. Tap the official MongoDB Homebrew Tap with the following command.
brew tap mongodb/brew5. Install MongoDB Community Edition using the third-party brew package manager.
brew install mongodb-community@4.4Where 4.4 is the version number you want to install.
In addition to the binaries, the install creates:
- A configuration file (/usr/local/etc/mongod.conf)
- A log directory path (/usr/local/var/log/mongodb)
- A data directory path (/usr/local/var/mongodb)
If you have previously installed an older version of the formula, you may encounter a ChecksumMismatchError. To resolve this, see Troubleshooting ChecksumMismatchError .
If you have any trouble with the installation, you can visit the official documentation on how to install MongoDB on macOS .
6. Next, we need to run MongoDB as a macOS service by using brew.
Running MongoDB as a macOS service sets the correct system ulimit values automatically.
The ‘mongod’ process is the server itself and needs to be running before we can start the ‘mongo’ database process.
To start the ‘mongod’ process, use the following command.
brew services start mongodb-community@4.4Where 4.4 is your version number.
To stop the ‘mongod’ process, use the following command as needed.
brew services stop mongodb-community@4.4MacOS may prevent mongod from running after installation.
If you receive a security error when starting mongod indicating that the developer could not be identified or verified, do the following to grant mongod access to run:
- Open System Preferences
- Select the Security and Privacy pane.
- Under the General tab, click the button to the right of the message about mongod, labelled either Open Anyway or Allow Anyway depending on your version of macOS.
7. Next, let’s verify that the MongoDB server is running.
Search for mongod in your running processes with the following command.
ps aux | grep -v grep | grep mongodAlternatively, you can view the log file to see the current status of your mongod process at /usr/local/var/log/mongodb/mongo.log.
8. Finally, start the database by connecting a mongo shell to the server instance.
mongoTo test that everything works, run the following function.
db.test()The function above should return the following, or similar, output.
{
    "db" : "test",
    "collections" : 0,
    "views" : 0,
    "objects" : 0,
    "avgObjSize" : 0,
    "dataSize" : 0,
    "storageSize" : 0,
    "totalSize" : 0,
    "indexes" : 0,
    "indexSize" : 0,
    "scaleFactor" : 1,
    "fileSize" : 0,
    "fsUsedSize" : 0,
    "fsTotalSize" : 0,
    "ok" : 1
}
That’s it, you’re ready to start learning MongoDB. You can skip to the next lesson where we discuss Data Modelling.
How to set up MongoDB on Linux
This section will only cover the installation process on Ubuntu.
It’s worth it to note that MongoDB does not support the Windows Subsystem for Linux (WSL).
If you want to install on other Linux distributions, please see the following list with links to instructions on the official MongoDB documentation.
- Install MongoDB Community Edition on Red Hat Enterprise and related Linux systems (like CentOS) using .rpm packages.
- Install MongoDB Community Edition on Debian systems using .deb packages.
- Install MongoDB Community Edition on SUSE Linux systems using .rpm packages.
- Install MongoDB Community Edition on Amazon Linux AMI systems using .rpm packages.
If you have any trouble with the installation, you can visit the official documentation on how to install MongoDB on Ubuntu Linux .
Follow the steps below to install MongoDB Community Edition using the apt package manager.
1. Open your terminal by pressing Ctrl+Alt+T.
2. From the terminal, run the following command to import the MongoDB public GPG Key from https://www.mongodb.org/static/pgp/server-4.4.asc
wget -qO - https://www.mongodb.org/static/pgp/server-4.4.asc | sudo apt-key add -The terminal should respond with an Ok status.
If it doesn’t, and if you receive an error indicating that gnupg is not installed, you can install gnupg with the following command.
sudo apt-get install gnupgThen, simply retry to execute the previous command.
wget -qO - https://www.mongodb.org/static/pgp/server-4.4.asc | sudo apt-key add -3. Next, create a list file for MongoDB with the following command.
echo "deb [ arch=amd64,arm64 ] https://repo.mongodb.org/apt/ubuntu focal/mongodb-org/4.4 multiverse" | sudo tee /etc/apt/sources.list.d/mongodb-org-4.4.listWhere 4.4 is your version number.
4. Reload the local package database with the following command.
sudo apt-get update5. Install the latest stable version of MongoDB with the following command.
sudo apt-get install -y mongodb-org6. Next, we’ll ensure the ulimit value for the number of open files per user is 64,000 or more.
Most Unix-like operating systems limit the system resources that a process may use. These limits may negatively impact MongoDB operation, and should be adjusted to 64,000 or more.
uLimit refers to the per-user limitations set for various resources. If your ‘mongod’ server instance executes as a user that’s also running multiple processes, or multiple mongod processes, you might see contention for these resources.
To change the ulimit settings, run the following command.
ulimit -n 64000For more information on MongoDB and Linux ulimits, see the official documentation .
7. To run and manage your ‘mongod’ server process, you will be using the system’s built-in init system.
Recent versions of Linux tend to use systemd (which uses the systemctl command), while older versions of Linux tend to use System V init (which uses the service command).
If you are unsure which init system your platform uses, run the following command.
ps --no-headers -o comm 1The terminal will respond with systemd or init . Choose one of the appropriate commands below based on the response.
7.1 Start the ‘mongod’ server with the following command.
sudo systemctl start mongodIf you receive an error similar like Failed to start mongod.service: Unit mongod.service not found., run the following command first.
sudo systemctl daemon-reloadThen run the start command above again.
sudo service mongod start7.2 Verify that the server has started successfully with the following command.
sudo systemctl status mongodsudo service mongod status7.3 Stop the server as needed with the following command.
sudo systemctl stop mongodsudo service mongod stop7.4 Start the database (‘mongo’) with the following command on another terminal instance.
mongoTo test that everything works, run the following function.
db.test()The function above should return the following, or similar, output.
{
    "db" : "test",
    "collections" : 0,
    "views" : 0,
    "objects" : 0,
    "avgObjSize" : 0,
    "dataSize" : 0,
    "storageSize" : 0,
    "totalSize" : 0,
    "indexes" : 0,
    "indexSize" : 0,
    "scaleFactor" : 1,
    "fileSize" : 0,
    "fsUsedSize" : 0,
    "fsTotalSize" : 0,
    "ok" : 1
}
That’s it, you’re ready to start learning MongoDB. You can skip to the next lesson where we discuss Data Modelling.