Angular Custom Databinding Tutorial
In this Angular tutorial we learn how to communicate between parent and child components in Angular with custom property binding and the @Input and @Output decorators.
Lesson project setup
For this lesson there is no initial setup other than having an app.
To keep things simple, we will be working directly from inside the main ‘app.component’ component and will create whatever else we need on a step-by-step basis.
Communicate from parent to child with custom Property Binding
Custom property binding, along with the @Input decorator, allows us to pass data from a parent component down to a child component.
For example, let’s say that we use our root component to fetch and process data from an external data source, like a database.
We also have a component embedded in the root component called ‘employee’ (making it a child of the root component).
The ‘employee’ (child) component is responsible only for displaying a list of employees from the data that’s passed down from the root (parent) component.
We do this by creating our own custom property to bind to.
1. First, let’s open up a second terminal/command prompt and create a child component, called ‘employee’, with the ng generate component CLI command.
If you’re using Visual Studio Code, you can simply click on the + button to the right of the terminal panel to add a second one.
ng generate component employee2. Next, let’s open the root component and embed our new employee component.
<h1>Root component (Parent)</h1>
<hr>

<app-employee></app-employee>
3. For the sake of the example, we will hardcode our “external data” into an object in the root component class.
We can imagine, for now, that the class retrieved and then parsed the data from a database.
import { Component } from '@angular/core';

@Component({
  selector: 'app-root',
  templateUrl: './app.component.html',
  styleUrls: ['./app.component.css']
})

export class AppComponent {

  employee = {
    name: 'John Doe',
    age: 34,
    department: 'Finance'
  }
}
This is the data we want to send to the child EmployeeComponent class.
4. To send the data, we can use property binding on the ‘app-employee’ selector where it’s embedded in the HTML View.
Our EmployeeComponent is embedded in the root component so we will do it there.
- First, we make up a property we want to use, in this case emp , and surround it with the property binding square brackets.
- Then, we target the employee object that we created in the root component’s class as its value.
<h1>Root component (Parent)</h1>
<hr>

<app-employee [emp]="employee"></app-employee>
This is not enough to pull the employee data however.
5. When we take data in from another component, we use the @Input decorator on the class that receives the data. This is to tell Angular that we want it to receive data, and which property to expect the data from.
Our EmployeeComponent will receive the data so we specify the decorator in its class, followed by the property we want to get the data from. In this case the property is the one we made up, emp .
import { Component, OnInit, Input } from '@angular/core';

@Component({
  selector: 'app-employee',
  templateUrl: './employee.component.html',
  styleUrls: ['./employee.component.css']
})
export class EmployeeComponent implements OnInit {

  @Input() emp:any;

  constructor() { }

  ngOnInit(): void { }

}
Remember that decorators can accept arguments so we have to specify the parentheses when we use them.
6. Finally, all that’s left is to actually display the data from the object we took in.
<h3>Embedded 'employee' component (Child)</h3>

<p>
  Name: {{ emp.name }}<br>
  Age: {{ emp.age }}<br>
  Department: {{ emp.department }}
</p>
We stored the employee object in the emp property, so we use it with dot notation to get the object’s individual elements and display them.
Communicate from child to parent with custom Event Binding
In the previous section we passed data from a parent component (our main ‘app’ component) to a child component (the ‘employee’ component) by using custom Property Binding and the @Input decorator..
This time we are going to reverse the process and send data from the child component to the parent component. We do this with custom Event Binding and the @Output decorator.
For this example we’re going to use a simple button to send an event from our child component to the parent component.
In our case the child component is the EmployeeComponent we created in the previous section of this tutorial, and the parent component is our main ‘app’ component (or ‘root’ component).
1. In the child component’s View, let’s create a button with a normal click event that will execute a method. We will call it fireAlertEvent().
<h3>Embedded 'employee' component (Child)</h3>

<button (click)="fireAlertEvent($event)">Click me to fire event</button>
Our method can take a special variable called $event as an argument.
This variable is an object that holds all the data about whatever event is fired off. We will process and use this data in the parent component.
2. Next, we create the actual custom event and a new event emitter that will send the data to the parent.
import { Component, OnInit, Output, EventEmitter } from '@angular/core';

@Component({
  selector: 'app-employee',
  templateUrl: './employee.component.html',
  styleUrls: ['./employee.component.css']
})
export class EmployeeComponent implements OnInit {

  @Output() onAlert = new EventEmitter();

  constructor() { }
  ngOnInit(): void { }

}
Let’s go through the example above.
- Because we’re sending data, we use the @Output directive.
- Then we create the custom event called onAlert.
- We assign a new EventEmitter object to the event so that we will be able to use its .emit() method to actually send the event.
- Finally, at the top of the document we import the Output and EventEmitter packages from Angular’s core.
The fireAlertEvent method will use the new event emitter to send the data, so let’s add it now.
...
export class EmployeeComponent implements OnInit {

  @Output() onAlert = new EventEmitter();

  fireAlertEvent(e:object) {
    this.onAlert.emit(e);
  }

  constructor() { }
  ngOnInit(): void { }

}
Let’s go through the example above.
- In the HTML View, the method uses the special $event
variable as an argument, so we need to have a parameter to be able to work with it.
- We call the parameter 'e' just to demonstrate that its a regular parameter, we don’t use $event here in the Logic.
- We also know that its an object so we can explicitly define its type as object
- Then we actually send the data with the .emit() method that’s now available to us from the EventEmitter class.
The sending/emitting part is done. Now let’s set up the receiver (listener) on the parent.
3. We will start with the parent’s View and use the onAlert event on the embedded child component.
<h1>Root component (Parent)</h1>
<hr>

<app-employee (onAlert)="alertMe($event)"></app-employee>
Let’s go through the example above.
- We want to attach our custom event to the embedded child because we’re listening for the event that will be fired from it.
- We use our previously created onAlert event that will invoke a new method called alertMe().
- The alertMe() method will receive the event that’s sent from the child so it needs the special $event variable as well.
4. All that’s left to do now is to handle the event data we receive in the parent class.
import { Component } from '@angular/core';
import { Alert } from 'selenium-webdriver';

@Component({
  selector: 'app-root',
  templateUrl: './app.component.html',
  styleUrls: ['./app.component.css']
})

export class AppComponent {

  alertMe(e:object) {

    alert('Alert from parent. Event data: ' + e);
    console.log(e);
  }
}
Let’s go through the example.
- Again, because the alertMe() method takes $event
as an argument, we need to set up a parameter to handle it.
- Like before, we’ve named the parameter 'e' and made it of type object
- We add a simple browser alert to demonstrate that the parent has received the event and the object with the data.
- We also log the data to the console for demonstration.
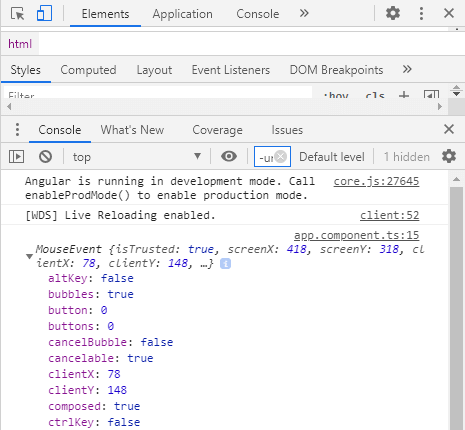
If we go into the browser now and click on the button, it will show an alert with the following.
Alert from parent. Event data: [object MouseEvent]We can right-click on the page and choose Inspect to bring up the browser’s tools.
Under the Console tab we can see the MouseEvent that was triggered when we clicked on the button.
Because it’s an object, we can click on the arrow next to the event name to expand it and see all the properties associated with it.
We can use everything inside such an event object in our app.